Before we enter the Forest of the Winglies, we need to make a small side-trip first. In the Evergreen Forest, return to the central area, with the raised hill where you first found Teo and Kamuy, and use the southeastern exit that was being guarded by a mercenary earlier on. Continue east to exit out to the world map, then over to the Tragic Village of Neet. You'll recognize the area where Rose split from the party and met the Sacred Sisters. Examine the lamppost on the right-side of the entrance to find a Stardust. That's all there is to be found in Neet.

The exit north from the before-mentioned raised hill leads to a seemingly dead end. Using her Wingly wings of light, Meru will, however, open a portal leading to the hidden Forest. As expected, humans entering their realm is met with resistance from the guards, despite Dart's insistence they are there to join forces against the Divine Dragon. Thankfully, one of the Winglies interrupts to announce that the Ancestor will meet with the humans, and you are free to enter the village.
As you'll recall from Meru's visit, there's a teleporter to the north of the entrance used to access the village. Outside, talk to the Wingly near the save point to have him take you up to the housing area. In the first unit, you can use a pool of water to descend back to the entrance on your left, while the right takes you to two teleporters used to move further within. To the north, however, Meru can stop by and visit her parents for a small scene where her father's cold heart is melted just a little.

On the right-side of the first housing unit, there are different teleporters on your left and right. Use the left-handed one to be transported to the shopping area. The item shop contains nothing you haven't seen before, but I highly recommend you purchase several Healing Breezes and Angel's Prayers for the next dungeon. Once you enter the dungeon, you cannot exit and the area contains an optional boss and, possibly, one of the hardest bosses in the game. At the armory, pick up a War Hammer for Meru, and add the Magical and Spiritual Rings to your inventory as you can only obtain them by purchase. The Magical Ring vastly increases a character's magic attack, but in my opinion, even though its effect is greater than the Attack Badge, I would recommend it instead. However, I think in the case of Rose and Astral Drain, the Magical Ring could be a nice pairing for her, or even Haschel, but the latter I would keep with the Attack Badge, for now. The Spiritual Ring is, finally, a way to greatly boost a character's magic defense. If you're using the Spirit Cloak with Albert/Lavitz, I would suggest you replace it with a Spiritual Ring. Buy an extra one for Kongol, as well. I don't think you should equip it now over the Bandit's Ring, but eventually, we will pick up some leg gear he can use to boost his dreadful speed. Also, if you didn't get a Spirit Cloak back in Volcano Villude, it is for purchase now. Note: If you equipped Albert/Lavitz with the Spiritual Ring, you may consider swapping the Phoenix Plume back to the Knight Helm.
Still in the shopping area, use the right-side teleporter and Meru will show Dart the village's deity, the Archangel, that will play a role later in the game. The left-side teleporter takes you to Guaraha's room where it is revealed that he and Meru are actually engaged, although Meru doesn't seem to be too interested in that. After the scene, search the shelf in the upper-right corner of the room to find a Stardust, then return to the housing unit below the shopping area.
This time, use the right-side teleporter to be taken further within the village. Have Dart check the greenish lights on the right-side pillar to find your 40th Stardust.
Above, in an area the party can use to heal for free, the elder Bardel brother is waiting on the group. He'll attempt to assault Dart, only for his efforts to be turned away by his Dragoon powers. Seeing the power of the Dragoon, the elder Bardel will shake with fear, only for his younger brother to insult him and threaten the lives of the humans.
Outside the healing point, the Wingly here will take Dart up to Ancestor Blano's residence. He'll agree that the Winglies and Dragoons should combine their powers to defeat the Divine Dragon. Usage of the Dragon Block Staff will be granted, however, it has been sealed away in the Forbidden Land of Kadessa. He can take the party there, but like stated previously, make absolutely sure you are prepared before accepting as you cannot leave the dungeon until it is completed.
Warping into Kadessa, you'll have a scene where Meru is overcome by the sadness of the people who have died in the Forbidden Land, but is determined to carry on. In control, climb the long pathway into the Royal Capital. On the next screen, have Dart take the first pathway leading southeast to crack open a Mind Purifier treasure. Return the way you came and follow the path to the northern exit. You'll then be in an open area littered with teleporters. Use the first nearby, then wrap around to the one to Dart's east, and from it, enter the building.

Inside, we're greeted by another round of teleporters and exits. Jump in the teleporter to Dart's upper-left, then the one on the platform he appears on. This will place you on a ledge with a treasure chest holding the Dancer's Shoes. This pair of leg gear for the ladies provides no defense, but does offer a +20 to Speed. In a world where the Armor of Legend exists, this will actually be the best footwear in the game for the females, but at the moment, you'll need to weigh the loss of physical defense from the Stardust Boots. Personally, I go ahead and equip this to Rose due to her Elude Cloak accessory. You will never be able to buy the Dancer's Shoes, but they can be farmed much later in the game. Once you've grabbed the chest, return back to the entrance of the room, then use the southeastern exit that takes you back outside.
Use the portal outside the room, then follow the ledge to the west to the one there, with the next one taking you back inside to yet another teleporter. Travel between the next couple of linear portals to be placed within a huge, coliseum-like space. Meru will explain that this is where Winglies, who dominated the other species 10,000 years ago, forced them to fight to the death for their entertainment. Once the scene is over, you'll be using another set of linear portals that take you up and over the giant coliseum.

You'll then end up at a sort of crossroads, seen above. There's a recovery point near the exit from the coliseum, however, it doesn't heal status, but you can use Dragoon transformation for that. From here, there are two different routes to our ultimate goal. One leads to a puzzle and then an optional boss, while the other to two really nice items and some annoying terrain. Solution: Do them both! Although there's nothing to be gained from the boss with the exception for EXP and a Healing Rain drop. For the sake of completion, we're going to be doing both sides.

Let's start with the boss first, since we can double-back to heal afterwards; so head down the narrow path to the north of the save point and into the structure. Inside are a number of murals and portals. As you probably expect, we need to enter these in a certain order, but if you repeatedly enter the wrong portals, you can see several scenes with your party members who eventually have pity on you and tell you the secret. To solve, we'll number the portals 1-6, starting from the left-side. Enter: 6, 1, 3, 4, 5, 2 and then warp using the device that lowers into the room. Before teleporting to the bottom of the next room, make sure you are prepared for a boss: the party manages to awaken yet another sleeping Virage.
This boss is a real oddball: you don't even really need to fight it to win. You'll notice that it begins counting down with "# Lives Remaining". When this number hits 0, although he'll unleash a fairly powerful attack, you'll automatically win the battle after. There's no need for that though, we can easily take him out before that. Unlike other Virage battles, you can either destroy the Head or Body to win this time, however, if you target the Head, you will be subject to said powerful attack it uses when it dies. So, just target the Body with your best attacks and if you're using one of the ladies, the Material Shield will come in handy here. Go ahead and use all of your Dragoon's SP, as the lower it is, the better going into the following boss fight. Once the Virage is dead, return to the save point area to heal, then use the teleporter to the right-side to venture onto the next area.

In this room there are a whole lot of Spinning Heads targeting Dart with some strange blue-colored switches on the floor. Dodge the monsters the best you can and run Dart around having him plunge his sword into the blue switches to not only stop the Spinning Heads, but lower one of the barriers around the door. Once you've activated all five, you can enter the before-sealed portal.
The following area has some moving stones much like the Valley of Corrupted Gravity. When Dart warps in, stand still, and when the stone approaches, jump on it, then ride it upwards twice to a treasure chest with the Power Up item. This is another item you can use indefinitely, but only once per battle. As the name suggests, this boosts all of your character's base statistics, other than Speed, for three turns.

From the Power Up item, jump back on the stone, then when it lowers to the next platform, jump onto the stone that approached from the north. Follow the path east to another stone that brings you below; doing the same with the next stone. Before jumping on the next set of stones, be advised that as soon as Dart's feet hit the stone, he needs to activate an action icon to hop over both stones to reach the chest or else you will have to climb your way back to try again. The treasure contains the Mind Crush sword for Dart. With it in hand, let the stone lower you to the below platform, then use the eastern-most stone to exit the area north.
You'll then be in the final area of Kadessa, with the Dragon Block Staff and a major boss awaiting you through the center, green-lit portal. Before entering, however, within this room, in 90% of the battles, you will face one or two Puck enemies. These guys VERY rarely drop the Dancer's Ring item. This is the female equivalent of the Bandit's Ring accessory granting a +20 Speed. The ladies are already pretty quick, but you will only find two other of these outside of being dropped here.
Before continuing on to the boss, I have some advice: The boss is entirely magical; which means that Albert/Lavitz and Kongol are in a lot of danger, however, with Phoenix Plumes, Magical Hats, and Spiritual Rings, they can survive and be very useful with their additions. Being in Dragoon form longer than one turn is extremely dangerous and thus you will be needing to rely on one-turn Dragoons and additions to win this battle. To do so, waste all of your Dragoon levels, with the exception of one. Switch to additions that gain little SP, like Moon Strike/Volcano, Gust of Wind Dance, Inferno, Hard Blade, and Flurry of Styx. Miranda/Shana is also a valuable ally due to her gaining 1 level of Dragoon form per arrow shot, allowing her to transform, then either contribute physically or casting Gates of Heaven. If planning to use Albert/Lavitz, equip them with the Twister Glaive for additional effect. When you're prepared, enter the center structure surrounded by the spiraling stairs.
As Meru goes to take the Staff from the ceiling, a bizarre creature with the Staff impeded in it, attacks the party. Most of the Grand Jewel strategy is stated above, but I'll note a few others things. If you brought Albert/Lavitz, they should use their only Dragoon turn to cast Rose/Blossom Storm, then afterwards, use the Power Up item on them and they will deal incredible damage on the boss with the Twister Glaive equipped. If a character happens to have two Dragoon turns, use the Speed Up item to attempt to get them used as quickly as possible. With a character in Dragoon form, once the Grand Jewel's turn comes around, it will use the Dragon Block Staff to drastically lower their statistics; and when I say drastic, it's not an understatement.
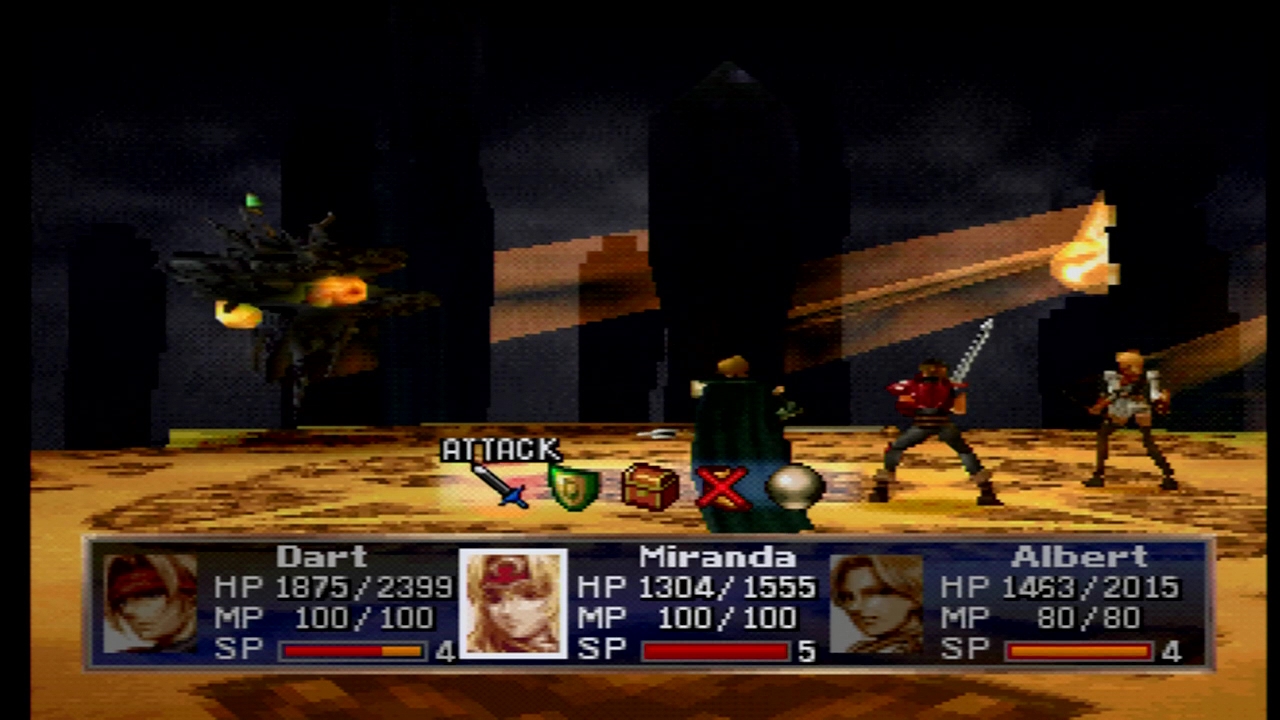
For example: in the above screenshot, I used Dragoon form with Dart, then following the Staff use, it cast Spectral Flash and it dealt 1800 damage to him. So, yeah, no Dragoon forms here unless only one turn. Once the Staff is used, it will eventually expire after several turns, so don't bother to try to use your Dragoon forms to attack during this time. Other than powerful, typically light elemental, magic, the Grand Jewel can also lower your levels, but after a couple of uses of this, he will return you to normal, which is odd. He'll also heal himself when his HP gets low, but if you brought enough Healing Breezes, and limit your Dragoon forms, you should make it through this incredibly difficult boss. For winning you receive a Spectral Flash item, which is the most powerful light-based magic item, and a very rare one so don't waste it.
With the Grand Jewel defeated, the party will acquire the Dragon Blocker item and you can use the next several linear portals to take you back near the entrance of Kadessa. Upon attempting to leave, the Divine Dragon will be seen flying overhead in the direction of Deningrad. Back at the Forest of Winglies, the Ancestor will fail to teleport the group back to the city, but when combined with the magic of the other Winglies, including Meru's parents, they are finally able to succeed. Unfortunately, it was too late, and a movie plays with the Divine Dragon devastating the city and demolishing the Crystal Palace with its Cannon.

Follow Miranda through the devastation toward the Crystal Palace and into the throne room of Queen Theresa. You'll see many scenes along with way, including the safety of all the Sacred Sisters, ending with a dazzling light protecting Theresa. Shana's mysterious power protected the Crystal Palace and all of those within from the Dragon's assault. Regrouped with Shana resting at the inn, the only building left in the city, the party gives their regards to Shana and resolves to set out to confront the Divine Dragon at the Mountain of Mortal Dragon before it can strike again.
Strangly enough, the destruction of Deningrad has uncovered several Stardusts in the city. To find your first, head back inside the inn, and toward the back, there is now a staircase to the top-floor. The upstairs has been turned into a clinic and Dart can inspect their machinery for a Stardust.
Next, enter the ruined Crystal Palace. On the second screen, where there used to be a staircase leading up to the kitchen area you found the Holy Ankh treasure, search the crystal remains for a second Stardust.
For the third, climb back to the throne room and search the rubble in front of what use to be the Signet room.
To find the last two, return to the entrance of town. The item and weapon shops have wares on display on a red carpet now. There is a Stardust on one side of the carpet...
And the other, to bring your total of Stardust to 45. Only five more to collect. Both shops are still available and selling the same items as before, just to note.
Speaking of Stardust, Martel and her baby have also just arrived in Deningrad from Tiberoa across from the shops. Handing over 40 Stardust will net Dart the Rainbow Earring accessory that protects against all status, with the exception of instant death. This is a nice choice for Dart if you're not keen on using the Holy Ankh, but not really needed if he has the Phoenix Plume equipped. Like all Martel's stuff, the Rainbow Earring is one-of-a-kind.
If you head back to Furni, some of the citizens are so frightened by the Dragon they can't talk right!
One last note: for an extra, small scene, since Shana is no longer in your party, if you make your way back to Seles there will be an additional scene between Dart and her parents, but is not missable. If you haven't already purchased the Angel Scarf accessory from Lohan, you may consider this if you're in the area; it is fantastic for Albert/Lavitz and later, Kongol. Also, there's the Ultimate Wargod accessory, at a whopping 10,000 Gold, that must be purchased here, as well. When prepared to scale the Mountain, make your way to the Evergreen Forest and the westernmost exit, just north from the Deningrad southern exit, that was being guarded by a knight. He'll wish Miranda and the party luck and you can take the Mind Purifier treasure from nearby before scaling the mountains north to the Mountain of Mortal Dragon.
Inside the dungeon, as well as outside on the world map, the Beastie Dragon commonly drops the unbuyable Total Vanishing item. Besides from trading tickets in Lohan, this is the best place in the game to pick them up. Also in the dungeon, Wyverns drop Down Bursts, which can be very useful against our upcoming opponent.
At the entrance of the Mountain of Mortal Dragon, if you check the corpse of the dragon on the right-side, there will be a small scene where the group will wonder if Lloyd is responsible. Afterward, there are two straightforward paths, with the second one containing an Attack Ball treasure, heading north up the Mountain.
On the third screen, you'll come to a fork in the path. Follow the northeastern path around to a ledge with a Mind Purifier chest, then return and enter the northwestern cave and pass through it to another multi-path room.
Enter the cave to the right of the one Dart exits and pass through a lava tube to a Healing Breeze.
Back to the crossroads, use the cave under the stairs and follow through to a Giganto Armor for Kongol. This should replace his current (For me) Lion Fur as it provides a nice magic defense boost unlike the Breast Plate.
Retrace your steps and climb the stairs to the north, this time, followed by another tube, then a chest containing a Dragon Helm just outside. The Dragon Helm is the best helmet in the game for the female characters, and maybe Dart, besides the Legend Casque. It provides a 50% increase in maximum HP, along with solid physical defense and heavy boost in magic attack (Equal to Legend Casque). I gave this to Meru, but any of the ladies can positively benefit from the Dragon Helm. There are only two of these helmets to be found, so choose carefully. Wrap around the path to the northeast and the party sees the Divine Dragon Cannon being fired above them.

Continue north from the small scene and you'll find a Total Vanishing treasure and a save point. Beyond the save point you'll hear the Divine Dragon already doing battle with someone else; presumably Lloyd. The next screen contains a major boss, but in the circular path, in the lower-right corner of it, is a very hidden treasure containing a Speed Down. This is another infinite, one-time-per-battle, item that lowers an enemy's Speed for three turns. Just above that, is another chest with a Body Purifier to be had. Before proceeding north, we'll have another similar battle to the Grand Jewel where our Dragoons will be mostly useless, so consider getting your Dragoon SP levels down to 1 again, but only if you're using Albert/Lavitz, Miranda/Shana, or Meru with supportive magic. Unlike the Grand Jewel, there will be no opportunity to use Dragoon offense against the Divine Dragon. Also, for any character not equipped with a Phoenix Plume, equip them with a Bravery Amulet or Rainbow Earring to prevent Fear.
Dart and company run in on Lloyd battling with the Divine Dragon. Despite wielding the Dragon Buster, he's only managed to weaken it, and it's not dead yet. However, when Lloyd notices that Miranda has replaced Shana, he disappears and leaves the rest of the fight to the Dragoons.

The Divine Dragon looks intimidating but is, in fact, a lot easier than the Grand Jewel. Dart begins by using the Dragon Block Staff, which shatters (Removing it from your inventory), but it's done the job by dropping the statistics on it and the Dragoons. You only need to defeat the Divine Dragon part to win, but it's advantageous to remove the Ball and Cannon parts to reduce its more powerful attacks. They also, thankfully, have fairly low HP. If you have any multi-target magic items, like the Down Burst that may have been dropped by the Wyverns, and you brought Miranda/Shana/Rose/Meru, throw the Power Up item on them, followed up by using the item for tremendous effect. Other than that, this is entirely a slugfest with single-turn Dragoon forms for Rose Storm or Gates of Heaven, and using your most powerful additions to whittle down the Dragon's HP. If you didn't protect against Fear and become inflicted, remove it immediately with Mind Purifiers, or the battle could turn ugly quick without Dragoons to remove it. You can make good use of your new Speed Down item here, too.
For winning the battle, the party is guaranteed a Gravity Grabber and Flash Hall (Strongest lightning-based magic item) to drop, but only an average chance to obtain the Dragon Shield accessory. This great accessory, that halves all physical damage, can be bought in Lohan for 5000 Gold, otherwise, this is your only way to obtain one. I equipped this on Rose over her current Elude Cloak.
Having slayed the beast for him, Lloyd comes in and slices open the giant eye of the Divine Dragon and extracts its Dragoon Spirit; letting the group know he plans on destroying the world. Afterward, the party needs to chase him down the Mountain.
At the last intersection, Lloyd will reveal his origins as a Wingly, using magic to knock Dart and Rose off the cliff and onto a lower one. There, a confused Rose will mistake Dart for someone else, then you'll see a similar scene you saw very early in the game where Dart's father and mother leave him to defend Neet against the Black Monster, only the next day to find his father's Dragoon Spirit in the rubble. Meru will then drop in and lift the two out with her wings. Miranda will then, reluctantly, tell the party that Queen Theresa is the key to Mille Seseau's Divine Moon Object and with that knowledge, the party needs to return to Deningrad immediately.