Attempting to pursue Colette, the two friends are stopped at the entrance of Triet by a group of Desian guards that have, somehow, managed to match Lloyd with his wanted poster. You'll then have to battle with two Bowmen and a Whip Master. Pushovers; when defeated, another pair of "Desians" taser Lloyd from behind and he and Genis are carted off to a facility somewhere in the desert with Noishe behind in tow. Genis, apparently of fellow-kin of these "Desians", manages to talk his way into being released, but he and Noishe will have to come up with a plan to rescue Lloyd.


Of course, an alarm sounds and two lackeys will try to stop Lloyd from escaping. These Foot Soldiers are the same ones you faced at Martel Temple, so if you didn't use a Magic Lens then, this dungeon is another chance to add them to your Monster List. Once Lloyd has slashed his way through them, the alarm stops, and you can exit to the north for a puzzle.


In the next room you'll come to a fork with two Raybits and a Foot Soldier available to fight. As with the Foot Soldiers, this dungeon is one of your only chances to use a Magic Lens on the Raybit to add it to the Monster List, but you will have another later on in the game. Also, Raybits have a rather nice drop available you will want to get too: White Silver. It will be useful to you, and I suggest at least getting one, but you mainly want to get it here to fill the Raybit's information in the Monster List. If you really want to be ahead of the curve, get two for some early customization, but hardly needed. Remember: you can go back to the cells to rest and save if you need to.

In the forked hall, once you've defeated the lone Foot Soldier, Lloyd will find his first-of-many Memory Gem items. These are used to activate sealed save points within dungeons, but hopefully, if you're a completionist, you carried over the Memory Circles from the Grade Shop so you can keep these rare items in your inventory.


Back outside, climb the stairs and exit to the left this time to be presented with yet another puzzle. What's this: a GameCube? Basically, the three pillars to the left respond to the Sorcerer's Ring's electric spark, then the room rotates based upon the direction indicated on the floor below it.


Follow up by shooting the bottom-most pillar, then exiting back east to find the room has changed to a Raybit enemy and a treasure with 1500 Gald. To finish the dungeon, fry the top pillar again, with the middle one second, to unlock the control room exit to the north.


Botta and his two Foot Soldiers are fairly easy, but for completionists, the important thing here is that Colette steals (Item Thief) from Botta (Yellow Quartz). This is your only chance to completely fill out Botta's entry. If Colette hadn't learned Item Thief yet before this battle, like warned in the first chapter, then this will not be possible to do and you'll have to complete his entry on another play. For the battle, use a Magic Lens on Botta, and focus on eliminating the two Foot Soldiers first. Botta's attacks are all blockable, and with Lloyd and Kratos double-teaming him with the two other's support is more than enough to win. However, be mindful of when Botta enters Overlimit mode and be much more conservative with your guarding afterwards. For winning, the party receives a Poison Charm accessory that protects against poison and slightly water elemental magic. Equip this on Lloyd over the Cape.

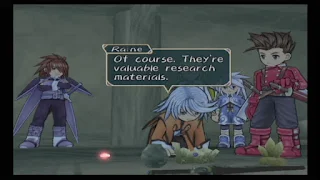
In Triet, the party decides to stay the night at the inn before venturing to the Seal of Fire. That night, the group, again, discuss Exspheres and Raine decides to take the one from Botta's sword upon herself; with Lloyd repairing the keycrest she just so happens to be carrying around with her other "research materials". Once in control of Lloyd, exit he and Kratos' room on the bottom floor and climb the stairs and check the second door from the left. This is Colette's room. To increase Colette's affection with Lloyd, have him enter and check on her, or decline for no change. Whichever you choose, enter Raine and Genis' room next door. Lloyd will hand over the keycrest to Raine and she'll thank him and become a fellow Exsphere user. To grow your relationship with Raine, talk to her once again for a scene.


Let's talk about the Monster List for a minute. Anytime you fight a monster or boss, they are added to the Monster List and this goes towards Raine's later Monster Collector title, however, the entry for the monster will be entirely incomplete from just this. To expand the information, we need to use a Magic Lens on the creature: this will unlock its statistics, attack element (AA), elemental strengths, and weaknesses. This can be done with any character, but to add the monster's location to the list, Raine MUST be the one that uses the Magic Lens; no alternatives, however, if it is not possible for Raine to be in your party at that point, like the bosses prior to now, the location is automatically uncovered with the use of a Magic Lens. Because of this, to completely fill the Monster List, Raine needs to be in your party for most every boss fight. Note: For some entries, the location will say "???"when Raine uses a Magic Lens, but without doing so, the entry will say "???????" instead like it is not revealed yet. Not all monsters have an item to steal, but if they do, Colette will need to use either Item Thief or Rover and successfully steal their item to uncover it. The same goes for monsters' item drops; which must be obtained at least once to fill the entry.
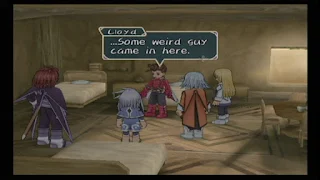
Okay, lots to do before we continue the storyline. Start by staying at the inn again. You'll get a scene where Lloyd will be startled by a stranger being in his room during the night. Then, stay at the inn one more time to see the skit "Prayer" with Colette. There should be another skit "Journey to Save the World" around Triet, also.

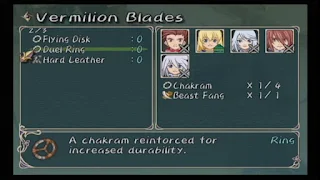
Next, let's visit the shops with our party. At the customization shop, make an additional Hard Leather for Kratos, and if you took my advice and bought four Chakrams in Iselia, use the Beast Fang and Magical Cloth you found in the Sylvarant Base to create a Flying Disk and Duel Ring weapons for Colette; equipping the latter. We'll revisit this again in a bit to use the other Chakrams. At the armory, buy a Ribbon and Gloves for Colette and Raine, with Capes for them and Kratos, too.


If you go back into the fortune teller's tent, she can vaguely describe each character's current affection for Lloyd. When it's at its highest, she will refer to that character as being Lloyd's "soulmate"; male or female.


Now that Raine has joined our party, let's talk about her titles as well as some additional ones that are now a lot easier to obtain. Also, I highly recommend that Raine learns her techs from the "Technical" side, as without it you will struggle to recover multiple party member's HP. Setting her strategy to "Heal" and "L-Range Magic" is also highly suggested for optimum performance.
Raine's Titles
Teacher: Character's default title with no statistical gain.
Researcher: Raine gains this title at level 20. (Int: 30%, HP: 20%)
Professor: Raine gains this title at level 40. (Str: 80%, HP, Int: 40%, Eva: 20%)
Wisewoman: Raine gains this title at level 100. (HP, Int: 100%)
Item Keeper: In battle, direct Raine to use the same item (Magic Lens to save Gald) five times in a row. (Def, Eva: 30%)
Survivor: Raine needs to be the only party member left alive at the end of the battle. Can be a bit difficult until Raine learns to cast Photon at level 18. To get this easier, set Raine as your controlled character in battle and your other three party member's position Strategy as "Hold Position". Find a battle with a Sidewinder in the desert and hide behind the other three members and let the Sidewinder slowly poison the other three (Make sure to remove the Poison Charm accessory) until they fall. Then, Raine can mop them up by casting Photon or beat them to death with her Rod. (HP, Str, Def, Int, Eva, Acc: 20%, TP: 10%)
Never Say Never: This one is a bit costly as you will need at least four Life Bottles in your inventory. Raine needs to die five times in one battle. Use the same strategy as for the Survivor title, except remove all of Raine's equipment, then run her straight into the Sidewinders at the beginning of battle. When she falls, command one of the characters to use a Life Bottle, then repeat this four more times. (HP: 50%, Str: 40%)
That's all for Raine, at the moment, but let's take a look at some other character titles we can better obtain at this point in the game.
Lone General (Lloyd): This is very similar to Raine's Survivor, but using Lloyd; so the same strategy applies. In battle, let the Sidewinders poison the other three party members until death, then have Lloyd change the party's orders with the up, left, or right buttons on the directional pad. You need to do this a total of four times with the other three characters fallen. The important thing is, for it to count, Lloyd needs to finish his voiceover for the command before issuing the next. (Eva: 30%, Def: 20%)
Oblivious (Colette): Once again encounter the Sidewinders in the desert and have them poison Colette and finish the battle without curing her. With her still poisoned, fight an additional battle and you will obtain the title. (HP: 30%)
Little Pickpocket (Colette): This is a cumulative one that will take a while. Colette needs to use the Item Thief or Rover tech combined for a total 400 uses. (HP, Str, Def: 60%)
Experimental (Genis): Need to have both the Nova and Fine Star weapons. In battle, open the menu and have Genis switch his weapons between the Nova and Fine Star five different times. (Acc: 30%, HP, Str: 10%)

West of Triet is the Triet Ruins which is our destination, but before that, continue to wrap around the mountain range nearby, to the south, and out to the grassy area near the ocean. There will be a ring of light here that will instigate a skit with Lloyd and Raine. Answering "What's wrong, Professor?" will increase affection with Raine, while the other will not change anything.

Now that we have Raine in our party and can make the most of the Magic Lens, let's backtrack a little and add monsters to our Monster List. Below is a list of enemies we can encounter at this point in the game and their locations. Unfortunately, we can't return to the Martel Temple, but we will take care of that later.
Outside Iselia: Rabbit, Wolf, Hawk
Iselia Forest: Minicoid, Giant Bee, Spider
Forests around Iselia: Ghost, Zombie, Slime, Tentacle Plant
Desert: Scorpion, Sidewinder, Thief

Among these enemies are a few rare items to obtain, also. Besides the Rabbits drop of the Beast Hide item, the regularly-encountered Wolf can have the Beast Fang item stolen by Colette. This will be used in several customization recipes throughout the game, but is fairly common from other monsters of the same type. If you already created the Duel Ring, try to get at least one additional Beast Fang for upcoming use. Beast Fangs and Hides both sell for 1000 Gald, which can be a early moneymaker, too.