

To begin the rescue of Chocolat, make your way to the Palmacosta Human Ranch, which if you'll recall, is far-east of the House of Salvation, around the mountain, in the middle of a forest. Upon entering, the skit "The Second Ranch" will pop-up for viewing. Neil will then reveal himself and suggest that instead of rescuing Chocolat, that the party instead, leave the area and return to the regeneration journey. Kratos and Raine will immediately recognize that this was all a set-up from Governor-General Dorr and Neil is trying to protect them from the treacherous Dorr who is working for the Desians. Despite this, the group is resolved to rescue Chocolat and you have an important decision to make. If you select: "Let's go attack!" it increases Lloyd's affection with Colette, Genis, and Sheena, but reduces Raine and Kratos'. You also immediately begin the next dungeon. Picking: "Let's return to Palmacosta." boosts Colette, Raine, and Kratos' affection, but drops Genis and Sheena's.
Regardless of your affection preferences, for completionists, it's extremely important that you choose to return to Palmacosta. If you elect not to, you will miss a one-time item. Either way, you will have to return to Palmacosta and confront Dorr eventually, but by not going immediately an item will become missable. When back in control, you can fight Whip Masters and Bowmen on the right-side of the ranch, but we'll be seeing plenty of them soon enough. Back out to the world map, wait a bit, and the skit "Dorr's True Intention" will emerge. In Palmacosta, stop by Marble's shop for a small scene with Cacao about Chocolat's abduction. Note: With Chocolat gone, you can donate Gald to the Martel church in the central plaza, but this is a fruitless effort, as we will soon find out and there is nothing to be gained from it.
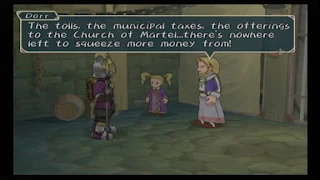
Visit the inn to rest and save before entering the governmental building and descending to the basement. I also recommend that you have Raine in your party. Lloyd and company eavesdrop on Dorr and his daughter talking to a Sorcerer from the Desian Ranch. The traitor has been raising money all along to pay off the Desians in hope of removal of a demon seed from his wife, Clara. The party confronts Dorr and, despising their sense of righteousness, reveals that his wife has become a creature like Marble and he had no choice if he wanted to save her. As the two bicker, Dorr's daughter, Kilia, stabs her father in the back! The real Kilia, having already passed, was replaced by a servant of one of the Desian Grand Cardinals to monitor Dorr.


A defeated Kilia tries to unleash the monstrous Carla on the group, but Colette will be able to calm her and she escapes. Raine will be unable to save a dying Dorr, but he will give Lloyd the Card Key item and passcode to enter the Human Ranch to rescue Chocolat. If you stormed the Ranch beforehand, you will not obtain this item and it is now unobtainable. Dorr will request that Lloyd find a way to save his wife. Lloyd can choose: "Okay." to increase Colette, Genis, and Sheena's affections. Or: "That I can't do." will raise Raine, Kratos, and Sheena's affections. The party can now enter the Palmacosta Ranch, but before leaving the city, there are several new skits available to view. They are: "He's a Father", "Parental Love", and "Mystery of the Desians".

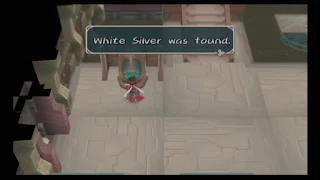
Talk to Neil at the entrance of the Ranch and he'll join you for the infiltration. Use the Card Key from Dorr along with the code number of "3341" on the non-conspicuous panel to enter the dungeon on the western-end. Immediately inside the skit "At the Palmacosta Ranch" is available. Whip Masters, Bowmen, and Raybits are found at the entrance of the Ranch. While statistically different than the ones you've fought earlier, their entries still count as the originals in the Monster Book when a Magic Lens is used. Use this opportunity to complete their entries with stolen/dropped items. Raybits still drop White Silvers if you want to pick up some for the future, which I strongly suggest, but they only appear in the very first room. If you want to farm them, use a Holy Bottle to avoid being chased by the Desian guards.
Note: The Palmacosta Human Ranch is a one-time dungeon and once completed you cannot return. That said, make sure to pick up all of the available items here.

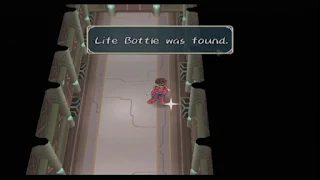


From the beginning, north of the save point, use the western portal, then the northern one and look for a hidden Apple Gel. Warp to the north one more time to be out on the spiral staircase you created earlier. Snag the hidden Panacea Bottle up top, then return the way you came. In the previous room, exit south, west, then north, and search out the hidden Orange Gel, and exit west again, north, and finally west to find Chocolat.

You'll need to battle the familiar set of Desian guards to rescue her. The portal to the north is the conclusion of the dungeon, so make absolutely sure you have picked up all of the items before continuing; as stated before: you cannot return to this area after the upcoming boss fight. There is also a save point to the east. If using Kratos, equip him with the Lid Shield before continuing. Magnius and a whole host of a goons are waiting for you in the control room. He seals Neil and the escaping captives inside a room and threatens to remove their Exspheres; just like with what happened to Marble. At this point, Magnius lets the information be known to Chocolat that it was Lloyd that killed Marble. Shocked, Chocolat runs into the loving arms of the Desians instead of being rescued by her grandmother's "murderer". The Whip Masters teleport off with Chocolat and you'll have to battle a group of guards. Chocolat, unknowingly I'm sure, will have left a useful Pass item behind for you.
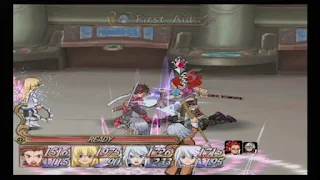
The party will then have to battle Magnius, a Whip Master, and a Bowman. Charge immediately after the Bowman and eliminate him to keep his bolts from interrupting your spell caster's chants. Magnius, himself, is all about fire and has several melee attacks that are either unblockable or will break your guard, and the former you'll need to backstep out of the way of or activate Guardian. He also casts fire elemental magic, which Kratos' Lid Shield will help ward him from, a little. Have Raine cast Barrier on Lloyd and/or Kratos, and assault Magnius with combos to keep him busy, then follow up with activating your Unison Attack for big damage. Genis should avoid casting any fire elemental spells, but Magnius is not weak against either ice or water, so any other element works fine. Like Botta, he will also enter Overlimit mode and becomes even more dangerous at low HP. Keep Barrier and First Aid cast and Magnius occupied with Lloyd/Kratos while your mages chip away at his HP. The party receives an EX Gem Lv1 and the Warrior Symbol accessory as their spoils of war. I equipped the Warrior Symbol, that boosts your attack power by 10%, on Lloyd over his current Leather Boots, but it works well for either Kratos or Colette, too.
Magnius crumbles to the ground, hopelessly defeated. Raine then frees the captive prisoners and the group suggests that Dirk be contacted about removing their Exspheres. Of course, all evil haunts have a self-destruct system that Raine will activate and the party retreats. Magnius is then visited by a rather ominous fellow, Rodyle, by projector and taunts him as he lay deceived and dying. Magnius finally cries out for someone named "Yggdrasil" and the Palmacosta Ranch goes up in smoke. Leaving the destroyed base, the skit "Justice and Strength" will become available. Back out to the world map, more skits, "Make Sense?" and "Someday" will also appear.

Return to Palmacosta and you can view an additional scene with Cacao about the fate of Chocolat and Marble at Marble's item shop. Also, with more White Silver in your inventory, create a second Masamune for your inventory, if you don't already have two. Lastly, there is a new, but pointless mini-game that can now be played. There's a Palmacosta soldier in the lower-corner of the central plaza where Lloyd can play Orienteering. A game where Lloyd runs around Palmacosta and talks to certain people/objects to pick up clues as to where the next is located. You can increase your time by setting the message speed to 0 and equipping Lloyd's Personal Lv2 EX Skill. In later editions of Tales of Symphonia, Lloyd can earn a title from playing, but in the GameCube version, your only reward is competing against your best time. Since it's just for fun, I'm not going to cover it much more than this, however, the fake "Wonder Chef" and his Tales of Destiny II/Eternia trivia questions are neat.


To the right-side of the Geyser, the group will spot the Spiritua Statue on top of a ledge nearby. Lloyd will have to play an easy mini-game where he'll need to hop across the frozen geyser before it melts and retrieve the wayward Statue. It's extremely easy to safely reach the statue: simply press the directional button for the next stone/boulder to jump to. If Lloyd succeeds, the affection for the entire party increases, but if he fails, he will be helped by whichever character has the highest amount of affection for him, and only that character will receive a boost while all other characters receive a drop in affection for our hero. With the Statue in hand, the skit "Tower of Salvation" will appear. Next, check the stone tablet to the right of where the mini-game took place to reveal the entrance to the Seal of Water. The party will cross the light bridge and enter the Seal while Sheena looks on; held back from following by Noishe!
New Monsters at the Thoda Geyser: Octoslime, Float Dragon, Green Roper, Water Element


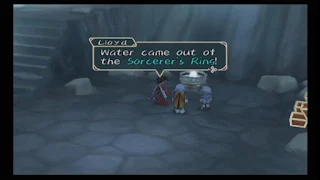
Back in the large room at the bottom of the stone stairs, search the Sorcerer's Ring altar to change its effect to a water-based one, plunder the nearby chests for a Life Bottle and Circlet, then exit to the southeast.


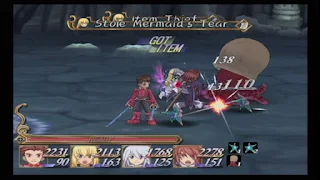
To release the Seal, Colette will have to undergo another test. Thankfully, if you've already been through the Palmacosta Ranch, this battle is very easy. Adulocia is the main target, with two Amphitra minions to deal with. Immediately at the beginning of battle, with the three enemies close together, charge into their ranks with Lloyd and unleash the Unison Attack of Fiery Beast with Genis (Beast and Flame Lance/Eruption). This will devastate all three and leave both Amphitras near death. From there, have Kratos casting Thunder Blade with Genis using Spark Wave/Thunder Blade if he is high enough level; if not, Eruption or Flame Lance, while Lloyd and Colette run offense and Raine heals. The Adulocia can cast Spread, which you can counter with Guardian, but its most powerful attack is blowing a series of bubbles at a character for surprising damage without a Poison Charm equipped. Overall, though, this battle is very easily won with magic assaults. You'll pick up a Mermaid's Tear for winning.

Across the sea at the Thoda Dock again, take another rest inside the House of Salvation for a skit between Colette and Kratos. Also, since word has spread that Colette is the Chosen One, you can now journey back to the Geyser via the washtubs for free. On the world map, there is a new skit to view called "Getting Bored", too.
