The Asgard Human Ranch is northeast of Luin, surrounded by forests like the one in Palmacosta. Lloyd and Raine will devise a plan to ambush a group of guards and take their uniforms in order to infiltrate the Ranch. You'll then have to battle a small group, including the new Spearman (Woman?), so throw a Magic Lens their way. With the uniforms, the group returns to Luin to prepare for the infiltration.
For some reason, only the female uniform is usable, and it only fits Raine. Sheena, however, will have her own set if she has already joined your party. The two will then bring the rest of the group as captives to the gates of the Ranch and they're be let in without a second thought. Past the gates, search the right-side of the grounds for a Beast Hide treasure, then enter the building to the north.
There's only one path you can take from here, to the northwest; the other being guarded, for now. In the control room, everyone decides to forgo the ruse and search around. From the surveillance camera, it would appear the Ranch is an Exsphere manufacturing plant. Colette, her senses heightened from the angels' power, can hear someone approaching. It's Botta, but he's not interested in fighting with you while Kratos is around. Still denying they are Desians, the two groups decide to call a truce. Three Sorcerers, with their dreaded fireballs, show up and try to stop Botta, but Kratos and Colette shield them and they run off without even a word of thanks!
A rather crude individual then enters the room referring to Botta as a
"Renegade". Kratos outs him as Kvar, one of the five Desian Grand Cardinals. He demands Lloyd turn over his Exsphere that was the product of his Angelus Project. Colette distracts him with a chakram toss and the party escapes out into the factory.
Nearby is a treasure chest with a White Robe for Raine inside. From there, make your way south, then around to the left-side, battling enemies and passing a save point; one of the guards holds a Memory Gem, also. Plunder the Iron Bracelet from the chest on the far-left-end, then continue north for a scene. I gave the Iron Bracelet to Genis, but it is a slight upgrade for the ladies, too.
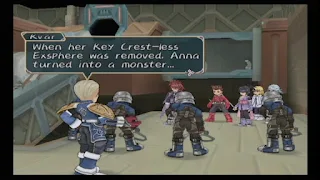
Kvar and his goons manage to corner the party as they watch captives from the Ranch move along a conveyor belt and into a machine; essentially becoming Exspheres! The name Yggdrasill, that Magnius mentioned, is brought up again; Lloyd's Exsphere having meant to be presented to him. Kvar then reveals how Lloyd's mother, Anna, who stole his unique Exphere from the Angelus Project, had her Exsphere removed and she became a monster like Marble and Clara. Lloyd's father then had no choice but to kill her! Lloyd and Kratos are both enraged, but Sheena steps in (Or appears if not in your party yet) and uses her last Guardian card to help the party escape from the Ranch. Having escaped, make your way back to Luin to regroup.
That night in Luin, the party wrestles with the truth that Expsheres are created at the expense of human lives. Lloyd wants to throw them away, but Kratos and Colette suggest that the people who were sacrificed to create them, including Marble and Lloyd's mother, would not want to simply be discarded, but used to stop the creation of more victims. Lloyd will get the opportunity to say "All right." which raises the entire party's affection, or "No!" that only increases Kratos', but by a larger amount. Either way, the party is in agreement to use the Exspheres to stop the Desians and regenerate the world. If she hasn't already, Sheena will then officially join your party.
You'll then be back in control in Luin. With Sheena in your party, the skits "Corrine's Happy Too" and "Sheena Afraid of Failure" are available to view here. On the eastern-side of town, near the ruins of the weapon/armor shop, talk to the swordsman and Kratos will offer to train Lloyd again. Accept to raise Kratos' affection, or decline to lower it. Upon exiting town, Sheena will suggest we visit the town of Hima where a friend of hers, Pietro, who escaped from the Asgard Ranch, may be able to help them get back inside (Perhaps the giant boulder outside the Ranch was a clue?).
On the world map, a new skit: "Truth About Exspheres" and "Let's Make Them Pay!" should appear. The latter may only only be available if Sheena joined early and before you first infiltrated the Ranch, but I'm unsure. I would think it would still be possible to get it if she joined later, though. Anyway, you can view another skit: "The Power of Exspheres" if you return to the Asgard Ranch. There's also a short scene if you try to take Sheena by Lake Umacy. Lastly, if you reenter Luin, next to the priest you rescued in the destroyed fountain area, there will be a merchant you can use to auto-travel to Hima, however, we'd best walk to uncover more relationship light circles and monsters.
Let's take a timeout to talk about Sheena and the titles available to her right now.
Sheena's Titles
Mysterious Assassin: Character's default title with no statistical gain.
Acrobat: Sheena gains this title at level 40. (Str: 30%, HP, Def: 20%)
Ultimate Summoner: Sheena gains this title at level 100. (HP, Def: 100%)
Chicken: All you need to do is have Sheena in your battle party and escape from battle 50 times. (Eva: 30%, Int: 20%, TP: 10%)
Indecisive: Enter battle in control of Sheena and begin the escape countdown, then cancel it. Do this three times in one battle and Sheena will obtain the title when the battle is won. (Def: 20%, HP: 10%)
Party Comboist: Make Sheena your battle character and fight until your Unison gauge is filled. Then, set Sheena's Lv1 EX Skill to Taunt and all other character's Strategy to "Hold Position". Enter battle and activate your Unison Attack; with whatever attacks you like as long as it doesn't end the battle. From there, have Sheena use her Taunt skill with the Z button until the Unison gauge fills again, then activate a second Unison Attack. Sheena, having started two Unison Attacks in one battle, will earn the Party Comboist title when the battle ends. (Str, Acc: 20%)
Combo Conductor: This one is a bit tricky as it requires a single enemy in the battle. Firstly: Form a party of Sheena, Colette, Lloyd and Genis. Make Sheena your controlled character in battle and set all other character's Strategy to "Hold Position", with their Unison Attacks as: Pyre Seal (Sheena), Para Ball/Angel Feathers (Colette), Beast (Lloyd), and Flame Lance/Eruption (Genis). Find a lone Insect Plant in the forests around Luin. Have Colette cast Holy Song on the party, then rush in and with doing nothing else, activate the Unison Attack with Sheena. The four character's attacks along with the Fiery Beast combination of Lloyd and Genis should be plenty of damage to kill the Insect Plant in one hit. If the Unison Attack is the only damage done to the enemy, Sheena will be rewarded the Combo Conductor title. (Str, Acc: 30%, HP: 10%) If you're having trouble, I'll provide an easier way when we return back to Triet.
Another noteworthy aspect of Sheena is her Lv2 EX Skill: Personal. With it equipped, in dungeons, regardless of who is your on-screen character, if you come into slight contact with an enemy icon, they will be repelled and you won't enter battle. However, if Sheena's Luck is over 200, which requires some inn manipulation and equipment, she will completely repel every enemy! One final note on Sheena: she starts with the tech, Summon: Corrine, which is not particularly special, but she only temporarily has access to it. This is mainly for those that like to maximize their tech usage.
One final thing before we make the journey to Hima. Now is a great time to try for the 30-hit combo title for Lloyd. Start with a party of Lloyd, Colette, Genis, and Kratos. Set Lloyd's Unison Attack to Tiger Rage/Heavy Tiger Blade, Colette to Ring Whirlwind, Genis to Spark Wave/Thunder Blade, and Kratos to Air Thrust. A perfect enemy to pick is the Dragon Rider/Velocidragon combo. Start the battle with Genis casting Spark Wave/Thunder Blade, depending on your side of the Tech line, then right after it casts, rush in with Lloyd and perform Sword Rain: Alpha/Sonic Sword Rain. Before the final hit connects, activate your Unison Attack with all four characters. It will end in the 7-hit Lightning Tiger Blade combination between Lloyd and Genis and, if all the attacks connected well, will have resulted in excess of 30 hits. This rewards Lloyd the title of Comboist (Str, Acc: 40%, TP: 10%). Now, back to the journey.
New Monsters in the Hima area: Cockatrice, Ogre (Plains), Sorcerer, Warrior (Roads), Tortoise (Beaches)
Across the bridge to the west of Luin, you'll begin to find some new enemies mixed in with older ones. None are particularly noteworthy, but make sure to add them to your Monster List. Also, in the area, look for the skit "Colette Not Cold" to view.
Another skit you can view now, with Sheena in your party, is called "What's EC?" and it rarely pops-up when riding Noishe for a length of time.
Just off the bridge, to the north, is a lonely chest with a Technical Ring inside. This one-of-a-kind accessory is the brother of the Strike Ring you picked up near Balacruf Mausoleum. When equipped, it gives a +1 advantage to falling to the Technical side of the Technical/Strike line. Simply put: it's like you have an additional T-Type EX Skill equipped. In the screenshot above, down on the beach area, you can see a relationship light ring. It is for Raine; and selecting "You'll get better eventually." will increase her relationship with Lloyd, with the other having no effect.
Return to where you crossed the bridge, and this time, move south into the forests. Follow them southwest, onto a slope with even more forests, and look for a semi-hidden light ring. Kratos will have a skit with Lloyd. Pick "I don't dislike you." to improve affection with Kratos, or the former option for no change.
Hima is nearby, but there's another light circle for us to find. Far to the southwest; easiest to hug the coastline to find, you'll come across the bridge that leads back to Izoold and the Ossa Trail. On the sands nearby is a Genis light circle. Say "No." to boost Genis' affection, or "Yeah." to leave it alone.
From the Genis circle, make your way back northeast, then turn southeast near the forests to see Hima that is etched into the mountainside. Don't enter, but instead hug the mountains to the southeast, and then north when the mountain makes a turn. In this cove is the Hima area Guidepost Monument and a light circle skit for Colette. Pick "Hehe, I know." to boost her relationship with Lloyd, or "You think?" for no change at all. Once seen, return back west and enter Hima.
In the tiny hamlet of Hima, you'll see the merchant from Luin at the entrance whom you can use as a quick-jump back to Luin. Move east, past the Katz team, to a graveyard-like area. Colette can name the dog here, Rockie.
Continue to climb the mountainside to the top of a plateau. There's a scene here where the group overlooks the massive Tower of Salvation in the distance, and meets an eccentric fellow who is planning to create a tour where you can ride dragons and view the Tower up-close. May be of use to us later on.
On the southern-end of Hima is a small inn and a weapon/armor shop. There's another stray dog outside the inn for Colette to name, too, Boo!
Visit the Hima shop and purchase two Osafunes, one for future customization, since it is weaker than the Sinclaire (It's not exactly the Osafune from Castlevania: SOTN). An Amber Cloak, but leave the Mage Cloak equipped to Genis since its Int boost is better than the Amber Cloak's extra defense, in my opinion. Buy a Cleric's Hat for Lloyd and Genis; this is also best for Kratos, but we will get a free one very soon for him. Not only boosting Int, the Cleric's Hat also provides a superb HP regeneration effect like the Omega Shield. Pick up Tartan Ribbons for Colette and Sheena, and one for a later-joining character, but I recommend leaving the Gold Circlet equipped to Raine for the Int increase. Also, Pretty Mittens for the ladies, but don't sell the Kitchen Mittens as they provide protection against fire magic. Lastly, purchase a Leather Cape for your inventory, but I think keeping the Leather Boots equipped is a better idea.
Note: This shop updates not too long into the future and the Cleric's Hat, Amber Cloak, and Pretty Mittens will stop being sold and thereafter become missable items. The Osafune weapon will disappear, too, and even though you can customize for it, it requires the unique Mumei to do; so it is technically missable, as well. It's very important you buy as many of these items as you want right now.

At the customization shop, you won't be able to create the Nimble Rapier yet since it needs Brass. Remove Kratos' Omega Shield and use it to create the Red Shield. While it being better than the Omega Shield is debatable, you will need to customize for a Red Shield to obtain one, and you can purchase another Omega Shield later. Ignore the Armet Helm since, in my opinion, it's not better than the Cleric's Hat, and we will also find one in a treasure chest. Lastly, create a Stinger Ring for Colette, but you'll get get a free one later if you want to save the materials. With so many equipment changes, I'll give you a quick list of my recommendations at this point.
- Lloyd: Sinclaire, Ring Mail, Cleric's Hat, Iron Gauntlet, Sephira/Leather Boots, Spirit Bangle
- Colette: Stinger Ring, Iron Guard, Tartan Ribbon, Pretty Mittens, Rabbit's Foot, Guardian Symbol/Talisman/Leather Boots
- Genis: Falling Star, Mage Cloak, Cleric's Hat, Iron Bracelet, Talisman/Leather Cape, Leather Boots
- Kratos: Silver Sword, Ring Mail, Iron Helm (Soon Cleric's Hat), Red Shield, Heal Bracelet, Leather Boots
- Raine: Ruby Wand, White Robe, Gold Circlet, Pretty Mittens, Magic Mist, Leather Boots
- Sheena: Card of Water, Yayoi, Tartan Ribbon, Pretty Mittens, Leather Boots, Warrior Symbol

Done with equipment, enter the inn. Stay the night to view the skit "Sheena's Nightmare", then enter the door next to the save point. Search the boiling pot on the floor to find the Wonder Chef. He'll teach you how to make the recipe, Risotto; another recipe that recovers the party's HP. With Risotto, successfully cook it after a battle with Colette to trigger a skit with Kratos called "Too Hot" that is easily missed.

Talk to the woman, Sophia, guarding the way to the upstairs of the inn to further the story. A friend of Sheena's, she says that the man that escaped from the Ranch, Pietro, has already passed away. Look for his grave on the slope leading up the mountain behind the inn for another scene. The group goes to pray, when the man himself, Pietro, comes up behind them muttering about the Chosen and angels dying. Sophia shows up and rushes him away and everyone meets back up at the inn. Pietro's mutterings suggest that to get behind the boulder hiding the underground entrance to the Ranch, the party needs a jewel. Sophia asks you to get the Boltzman's Book from the Tower of Mana to help lift the "curse" on Pietro, but of course, Clara has the key to the Tower, so shutting down the Ranch takes priority. Afterwards, the group will take the Desian Orb from Pietro's "grave"; the jewel needed to move the boulder. Before you leave the graveyard, the skit "Kratos...angry?" can be viewed. Once back on the world map, another skit, "Lloyd's Parents" will pop-up, also.

Time to finally do away with Kvar's Ranch for good. Have Lloyd search the obvious entrance (boulder) to watch him try to move it himself, only to have Raine push it away effortlessly with the Desian Orb. Inside, the party has to battle a group of guards before they are alone in the control room to come up with a plan.

The only way we're going to make it to Kvar's holdout is to split into groups; one going after Kvar and the other deactivating the guard system and rescuing the prisoners. Whoever you choose to accompany Lloyd gets a boost in affection for him, while the others, a drop, however, Kratos gets a major decrease since he makes it clear he wants to fight Kvar. If you haven't had Raine use a Magic Lens on Kvar in a previous game, you're going to want to take her with Lloyd; her healing will also be nice to have, however, feel free to take whomever you like. Having Colette with Lloyd will trigger two skits, also, but I don't know if they are limited to this Ranch or not.
Note: Like all of the Desian Human Ranches, this is a one-time dungeon. While the enemies will show up again later, make absolutely sure you plunder every treasure chest here before completing both party's sections.
Once decided, you will be in control of Lloyd's group. Exit to the northwest into a strange-looking room with claw machines moving "freight" around. The chest to the first north has a third Cleric's Hat for either Lloyd, Kratos, or Genis. Then, on the left-hand-side of the room, a control panel to stop the transfer of prisoners, and chests with a Pellets item and Lamellar Leather armor. It is the only piece of this armor you will find in the game, so don't sell it by accident! Equip it on either Lloyd or Kratos, however. From there, return to the main room and the machine in the lower-half of the room, next to the save point, acts as a minor shop and refresher like the one at the Palmacosta Ranch. Then, exit to the left to be in a familiar area.

Since the last time we were here, the Desians dropped a Sorcerer's Ring altar that will upgrade the Ring's fire ability to shoot farther. Your goal is to get on both sides of the moving conveyor belt and shoot the enhanced fire at the glowing cylinders in the center; needing to time it just right. Once all six are out of commission, the conveyor belt stops and you can run up the one to the northwest.
Before exiting the room, look for a semi-hidden treasure with an Ex Gem Lv2 inside that is behind the conveyor belt tunnel. Inside the next room, move past the Whip Masters and try to use the warp tile to switch to the other party. Note: If you haven't already, use Raine to throw a Magic Lens on the Spearmen appearing here.
Now in control of the deactivation party, exit to the lower-right-side and you'll face-off with your typical guards, then exit south out into the Ranch's entrance. If you didn't get it earlier, there is a Beast Hide treasure here, but to advance, you'll need to move the crates out of the way to access the door to the northeast. This is easy: just pull/push them into the direction you came as seen in the screenshot above.
Back inside the Ranch, Raybits will appear in this large room of connecting corridors, and if you'll recall, they are a source of White Silver (As a drop) that are necessary to make a lot of future items.
From the exit past the crates, move northeast, and then into the left-most room. There's a chest with the Card of Earth weapon for Sheena, and a switch to activate on the floor; which closes the area you came through, but opens the one next to it with a Raybit sitting upon another switch.
Take the only exit, to the left, open to you and the group will rescue the Ranch's prisoners after taking out the Evil Sorcerers. Looks like Chocolat was taken to the Iselia Ranch, however. With the captives in tow, use the lower-left exit from the cells. Pop open the chest with a Stun Charm accessory inside (Not to be confused with the Stun Bracelet; the Stun Charm provides complete stun protection and slight light elemental defense) and activate the floor switch to, again, expose another Raybit nestled upon a switch in the far room. Go back into the previous room, exiting south this time, then you need to defeat the Raybits on both sides of the large room. This will deactivate the Ranch's security and you will switch to Lloyd's group before the warp tile that leads to Kvar. Have Lloyd cook Meat Stew, equip all three characters with a Paralysis Charm, and save before using the tile.
Note: When the scene switched back to Lloyd, who was partied with Colette, the "Kind Heart" skit activated for me between them, but I don't know if this skit is limited to the area or not. It seems out of place here since we're only fighting robots and guards and not Exsphere monsters. I fought one more battle, then the skit "I'm Sorry", connected with the other, occurred. Contact me if you know the triggers for these. To me, it seems like these skits fit more in line with the Remote Island Human Ranch way later on in the game, so it has me perplexed.

The group warps in on a conversation between a projected, leather-clad woman, Pronyma, and Kvar, bickering over the leadership of the Grand Cardinals. Kvar and his three Energy Stones are one of the hardest bosses in the entire game. You'll continuously be hit with lightning from all sides, preventing your mages from casting any spells and sustaining combos. If you equipped Paralysis Charms, this will lower the damage from most of the attacks during the battle, but it's still a rough going. Ignore Kvar and try to focus on one Energy Stone at a time, going ahead and using your Unison Attack on one at the very beginning of the battle.
With the Energy Stones active, there's little you can do in terms of strategy other than use items to heal and hope that the Stones try to overwhelm one character and not disperse to attack ones trying to cast magic. If Kvar sends a magic spell your way, immediately use the Guardian tech to defend. When the Energy Stones have fallen, use Colette to cast Holy Song, and fight defensively with Kvar; watching his attacks to guard efficiently and counterattacking with combos. The bad news is, like the rest of his brethren, he enters Overlimit mode when his HP gets low and becomes even more deadly, however, with his Energy Stones gone, he should fall with good defense. The party receives a Holy Ring and EX Gem Lv1 for winning. I replaced Kratos' Heal Bracelet with the Holy Ring, a rare accessory, that gradually restores HP during battle. The effect stacks with the usage of the Cleric's Hat/Omega Shield.

When Kvar falls, the deactivation group rejoins the others. Kvar, the characters having turned their backs to him, tries to strike at Lloyd, but is protected by Colette. Kvar attempts to flee, but is blocked by Sheena, and Lloyd and Kratos deliver finishing strikes to him; ending his cruel tyranny and avenging Lloyd's mother. Turning back to Colette, Lloyd reveals to the entire group of the changes she has endured because of the angel transformation. They need to return to Asgard for her to rest, but first, Raine blows the Ranch to smithereens! The same man that taunted Magnius at the Palmacosta Ranch appears before
the explosion and has some eerie parting words for Kvar, as well... Automatically returning to Asgard, the party contemplates the revelations about Colette, but it seems there is little they can do to stop her suffering.
When back in control, stay the night again at the inn to watch the skit "Born to Save the World". When you return to the world map, there will be additional skits to view: "Avenge" and "Chicken or the Egg".
Lastly, visit Harvey, who has moved to the lower-right house of Asgard's residential area and is in the side room. He'll give Lloyd and Genis the Figurine Book and six Pellets to go with it. You can't do anything with this quite yet, so more on this later.