

With the destruction of the area's Human Ranch, we can finally complete Colette's regeneration journey. Start off by returning to Lake Umacy, which is due-north of Asgard, among the forests. If we have any hope of lifting the "curse" placed upon Pietro, we're going to need the healing properties of the Unicorn's Horn that is sleeping beneath the lake. Sheena, reluctantly, reveals that she is a summoner and that with Undine, the Summon Spirit of Water's, help they may be able to reach the unicorn if she can forge a pact with it. Although, at this point in the game, only forming a pact with Undine is required, we can return to the three different Seals Colette has released and forge pacts with the Summon Spirits. You can start with either Wind or Water, but the Fire Seal has to be done after Water. If you try to return to Triet through the Ossa Trail before that, you will find that you can't get through. Sylph, the Summon Spirit of Wind, is without a doubt the toughest of the three, so we will save it for last.


Make your way back to Hima and there will be a commotion going on near the inn. Clara's being hunted down by a group of mercenaries! The party intervenes, but Clara escapes, bowling over Colette in the process, but leaving behind the Tower Key item. With it, we can enter the Tower of Mana.


After the decision, move Lloyd back into the center room and search the bookshelf to the upper-left to acquire Boltzman's Book; a required item to save Pietro. Exit the Tower of Mana and look for the skit "Master Boltzman" to appear on the world map before leaving for Hakonesia Peak and then to Palmacosta.


Exit Palmacosta and move northeast towards the House of Salvation, crossing the bridge. From the bridge, hug the river southeast to find a light circle for Sheena. Lloyd can respond: "Yeah." to boost affection with Sheena, or "Does it?" for no change. Afterwards, make your way east to the Thoda Dock and sail over to the Thoda Geyser.


Compared to the fight with Kvar, this is fairly easy. Undine is, obviously, strong against water so make sure Sheena is not using the Card of Water or Kratos the Hydra Dagger as a weapon; along with keeping Genis from casting any water or ice elemental magic. Undine has no weakness to exploit, however. The only concern you have is Undine's casting of Spread which will devastate whomever it hits, but having a Poison Charm equipped and using Guardian techs can ward off some of that effect. Keep the pressure on with Lloyd, Sheena, and Kratos, with the others supporting with magic and showing caution whenever the Summon Spirit enters Overlimit mode, and it should be a simple victory for you. Undine will drop the Guardian Symbol accessory, that increases a character's Defense by 10%, and should be equipped to Colette if you didn't get one already from the Grab Bag option.
Having proven herself, and apparently, this Mithos guy no longer upholding his part of the vow, Undine forms a pact with Sheena and she learns the techs S. Seal: Water, that adds the water element to a character's weapon, and Summon: Water, Sheena can use to summon Undine when in Overlimit mode. When summoned, not only does it cause water damage to enemies, but also restores HP to the party. The group acquires the unique Aquamarine accessory as proof of the pact, too. Equipped, it provides some resistance to water elemental attacks and automatically grants water to their weapon. The skit "Summoner Sheena" is also available afterwards. When you return to the world map, another skit, "The Truth..." will activate, as well.

Note: If you want, you can go back to Dirk's House and show him the
Figurine Book and he'll begin using your Pellet items to create
figurines. I highly advise against this, though. The Figurine Book is a bit of a complicated process and is much easier to do at the end of the game starting from scratch. If you're on a new game+, and given Pellets to him already in a past game, you might as well drop your current ones off. Also, while in the Triet area, if you had trouble getting Sheena's Combo Conductor title, you will occasionally encounter a single Thief in the desert area that you can use.


Anyway, remember this guy from our first trip through the fiery Ruins? We're ready to crack it open and take on the monster inside. First, form a party of Lloyd, Colette, Raine, and Genis, with Colette equipping the Aquamarine.

You can use the All-Divide during a battle to half the damage taken by all participants; friend or foe. This may seem like not a big deal, but you would be surprised by how much of an advantage this gives to the player's side. However, I would not recommend parting with one. With the Fake destroyed, you also get the contents of the chest: a Spirit Bottle. This rare item restores 30% of TP to the entire party.

There's no need to re-solve the Ruins' puzzles; the warp tile to the Summon Spirit is already accessible. I recommend equipping the ladies with Kitchen Mittens and Kratos with the Lid Shield to protect against fire for the upcoming boss. Efreet, still bound to Mithos' pact, isn't going to absolve it and form a new one with Sheena without a test.

Since fighting Efreet this early is optional, it's going to be a tough battle. Neither weak against ice or water, Efreet is an array of Eruption, Raging Mist, and Explosion spells; the latter which, if at a low level, absolutely needs to have a Guardian skill activated against to survive. Thankfully, the game has presented us with a few fire protection pieces of equipment thus far to help. If you're mindful with your controlled character, you can try to quickly backstep out of the range of his spells, too. For offense, Lloyd's Omega Tempest/Psi Tempest are great after a combo. Colette casting Holy Song and Raine consistently keeping the party healed with Nurse and Kratos with Healing Wind will be necessary; particularly if multiple characters get caught up in Raging Mist. When defeated, Efreet leaves the party an Attack Symbol accessory that boosts a character's Accuracy by 10%. I'd pass on equipping it now, but it is a semi-rare one.
Sheena then forms a pact with Efreet gaining the techs: S. Seal: Fire, adding fire element to a character's attack, and Summon: Fire, that produces a spherical Explosion in an area; inflicting fire damage and temporarily boosting the party's physical attacks. You also receive the one-of-a-kind Garnet accessory. It provides permanent fire to a characters attack and boosts resistance to fire attacks. Back to the world map, the skit "Just Another Pact" is available. Then, back to the Ossa Trail.

Remember this guy, also, we passed on fighting in the underground of the Ossa Trail? It's time we took him on, too, however, some setup is required. This is one of the few bosses in the game that does not guarantee their dropped items. That means to complete their entry in the Monster List, it's going to take some luck as you only get one shot at it. Also, he has an item to steal, as well. To help with the drop rate, create the Compound EX Skill for Colette, Item Finder, by equipping two Lv1 EX Gem skills: Sharp-eyed and Tough, then winning a battle to unlock it. Create a party of Lloyd, Colette, Raine, and Genis for the battle and make sure to save outside on the world map (On the Izoold side) to reset and try again if he doesn't drop his items.
Note: Players that have played Tales of Symphonia more than once are probably thinking: "Yeah, but you'll fight him two more times later." which is true, however, only in this first battle at the Ossa Trail does it have a chance to drop items. Also, if you fail to defeat this Sword Dancer before leaving Sylvarant, which is in the near future, it will disappear, and you will not be able to fight the two additions ones later on and some items will become missable as a result.
There's a reason we waited this long to fight the Sword Dancer: he's extremely tough and we need to kill him as quickly as we can to get both of his items to drop at the same time. Throw a Magic Lens and have Lloyd rush in and be a shield for the other three, but if you're taking heavy damage, focus on only guarding with Lloyd. Colette is, unfortunately, going to have to creep in and attempt to swipe his EX Gem Lv3 without being interrupted and/or dying. Raine should cast Field Barrier or Permaguard and cast Photon as much as she can as the Sword Dancer is weak against light. Once Colette has ripped his item, she can focus on Holy Song and then Angel Feathers from the back with Genis pitching in with items his best spells. Don't be afraid to use Lloyd to just defend and heal himself with items while the other three provide most of the offense. When available, unleashed Lloyd and Raine's Unison Attack combination of Omega Tempest/Psi Tempest and Photon for heavy light damage.

Colette's Pow Hammer has the potential to stun the Sword Dancer, allowing some free shots, as well as some of Genis' magic, like Flame Lance, Air Blade, and Spiral Flare, if he's on the Strike line, can knock him off of his feet to make things a bit easier. It's going to require many resets, most likely, but with some luck, the Sword Dancer will drop an EX Gem Lv1 and Lv2, and if you snagged his EX Gem 3 with Colette, it'll complete his Monster List entry. Unfortunately, there's little you can do to increase the drop rate other than Colette's Item Finder Compound EX Skill. There is also Technical Smash, which boosts the drop rate after battle, but performing good enough to gain more than 1% on him would be fairly tough to do. After the battle, the ghostly fencer vows to see you again and you gain the unique accessory, Yata Mirror. It gives both HP and TP regeneration during battle. I gave this to Raine and switched out her Magic Mist. Automatically you will view the skit "Elite from the Underworld", too.


This is a bit of a cluster. Bring Kratos with you to combine with Sheena and Lloyd to keep all three of the Spirits busy. Fairess, the shield-user, should be your primary focus as they are the magic user and has the lowest HP, unfortunately, when behind its shield, it is in a perma-guard mode, but magic can break through it and allow your melee fighters to do normal damage to it when staggered. The other two are going to be pummeling your party and interrupting your magic, making things difficult. Watch for Sheena to enter Overlimit mode and summon Undine to recover your party and damage the trio. If you can defeat Fairess, and make the battle 4v2, your odds of winning increase drastically. Neither of the Spirits have a weakness, so combo your way to victory, and be careful when timing your Unison Attack, as the Spirits can easily move out of the way; wasting your gauge. The old saying holds true for this boss: offense is the best defense. Go all-out and try to defeat them as quickly as possible.
For winning, the party receives the semi-rare items Saffron, Sage, and Savory that boosts individual statistics permanently. However, don't use them yet, as we can use a later item to increase their effectiveness. The new pact will then be formed with Sheena learning the techs: S. Seal: Wind that adds the wind element to a character's physical attack, and Summon: Wind. In regards to the new summon, it can be either really powerful or lackluster depending on the size of the enemy. It's best not used against really large monsters or some of the hits can miss. The summon does, however, also increase the party's movement speed in battle. Sylph gives you the Opal accessory that is one-of-a-kind, too. It boosts a character's resistance to wind attacks and gives them permanent wind element to their weapon.

For now, we've forged pacts with all but one of the Sylvarant Summon Spirits; the last of which will come much later in the game. We still need to complete the Tower of Mana, but before that, let's get a start on rebuilding Luin which will eventually result in some incredible rewards. However, it will be costly, but there is no hurry: it can be done at anytime in the game. Having saved Pietro, he is standing outside the destroyed Luin inn. He'll ask the party for a Gald donation to help rebuild. Here's the most important thing about this: donations must be done in specific increments; any more and the Gald over the amount is wasted. After donating the specified amount, whether at once or in small increments, you must leave Luin and reenter to begin to donate the next amount. At this point in the game, below are the exact amounts:
- 5,000
- 12,000
- 21,500
- 15,000
- 20,000
- 25,000
- 35,000
I assume that most of my readers are on new game+ and have carried their Gald over, so I will go ahead and cover the guide as if we are making all of these donations right now. If you want to farm Gald for this purpose, I recommend the Balacruf Mausoleum. Battle the bird enemy icons; two of which are in the room with the pinwheels, and Colette can steal Black Silvers from the Gargoyles and sell them for 1,000 Gald a piece; they also drop White Silvers that can sell for an additional 1,000. Ring Mails stolen from the Skeletons can catch a nice 900 Gald there, as well. As stated, though, this can be done at any point in the game, so there is no rush to get it done right now and I will frequently remember you going forward.

After the 15,000 donation, a dog will appear in town that Colette can name, Lucky. Note: If you've already completed the Tower of Mana, this will not be possible to do until later. After the 35,000 amount, the inn and item shop (Same merchandise) reopen for business. You can then pick up the Seafood Stew recipe in the item shop or view the Kratos inn scene if you didn't earlier. The quick-jump between Luin and Hima disappears, unfortunately, though. At this point, Luin cannot prosper further, so do not donate anymore money. Whether or not Luin was partially rebuild, it's now time for us to tackle the Tower of Mana. It's important to note that after the Tower is completed, Colette will lose her ability to speak and therefore be unable to name dogs and most skits involving her up to this point will no longer be available to view. All mini-games are cutoff from you, as well; even ones not involving Colette. This is the reason why I always save the Tower of Mana for last.
Depending on which characters are together in the parties, you'll get different skits within the Tower of Mana. Some of them are really fickle to get to activate. Particularly, I could only get the Sheena and Kratos to skit to appear when they were partied with Genis (Raine with Lloyd) even though he isn't involved in it. Other times, I couldn't get any skits to appear with Lloyd at all. I will list them below for those that are interested:
Lloyd and Colette: "Splitting Up is Nervous"
Lloyd and Raine: "Hurry and Regroup"
Lloyd and Genis: "Splitting Up is Anxious"
Lloyd and Kratos: "Difficult to Fight Separated"
Sheena and Kratos (And Genis?): "Splitting Up is Worrisome"
New Monsters in the Tower of Mana: Grim Reaper, Specter, Living Doll, Living Sword

Note: Like the last three Seals, the Tower of Mana, sorry to be repetitive, is a temporarily-available dungeon. Make sure that you open all the chests and completely fill out the entries for the Monster List or they will become missable later in the game.

In the Tower's atrium, pick whomever you like to accompany Lloyd and Colette. The affection has already been distributed to the character you chose on the prior visit, so who you take now has no effect. I picked Raine, but it's not important since the groups merge together before the boss. Just make sure the other group can fight efficiently, too. As Lloyd's group, climb the large staircase, one of the monsters on the way carrying a Memory Gem, and open the chest at the end with an Armet Helm. In the following room is a mirror and light puzzle that will be the focus of this dungeon. Use the Sorcerer's Ring to burn the curtain to the north, letting the light escape, then move the mirrored cube to the center of the room to reflect the light on the eastern switch, opening the door to the west. Through the door, out on a balcony now, there is a save point and you can use the panel nearby to switch to the other party.


The next room is way more complicated. To the left of the staircase is another curtain needing to be burned to free the refracting light. There are four mirror cubes around the room and they need to be arranged perfectly to create a light bridge above. You can identify each cube and their use by the shape of the mirror in their center. Use the screenshots provided to solve the puzzle. Only one cube needs to be near the staircase to shoot the beam northward.


Near the northern exit to the room, there are chests on the side containing a Moon Robe armor, for Raine only, Lunar Guard for Colette, and an EX Gem Lv2. The Lunar Guard armor is one-of-a-kind and increases Colette's Luck by 20. Exit through the door near the save point and open the upper-right treasure with a Stinger Ring inside, and exit east. The following room is barren, so exit southward, and fight your way through to the top of the stairs.


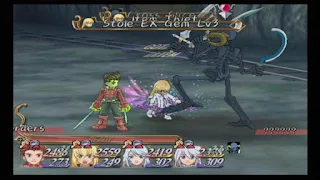
The angels' last test for Colette is the Pegasus-like Iubaris. It's weak against darkness, so for an advantage, use a Black Quartz on Lloyd and/or Kratos to do additional damage. Throw over a Magic Lens and direct Colette to move in to pilfer the White Quartz item Iubaris holds to complete its Monster List entry. White Quartz is also an extremely rare item, itself (Do NOT use or sell!). That out of the way, Iubaris will literally kick the crap out of you! It's very dangerous up close and personal; attempt to counter this with using a Guard Bottle, casting Holy Song, or Raine with Field Barrier/Permaguard. Iubaris has some magic, which can heavily damage you, also, but in my opinion, his thrashing and jumping around is really your biggest obstacle in the battle. When you see him rise into the air, quickly move to get behind him to avoid his Force Ray, and when he lands, use this opportunity to land your Unison Attack. When Iubaris falls, the party receives a Brass customization item that we've been lacking.


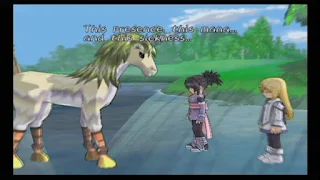
With the final seal released, the party gets a brief glimpse of the Summon Spirit of Light, searching for something named "Aska" and unable to form a pact because of their separation. Remiel will then "bless" Colette with the last of angelic power and guides her to the Tower of Salvation to complete the regeneration journey. She then learns the spell "Sacrifice". In my opinion, this is actually a very underrated tech. It causes Colette to fall in battle, but also deals heavy light-based damage, then recovers the party's HP. While considered to be a last-ditch effort, when used used carefully, it can be a great asset; only needing to use a Life Bottle on her afterwards.

Back on the world map, look for two new skits: "I Want to Save Colette" and "Are You Tired Genis?". For another, stay at an inn to view: "Why is Colette...". Although can be done later, if you make the trip all the way back to Dirk's House, he has a few goodies for Lloyd to help the sickly Colette. You'll acquire an EX Gem Lv3, Metal Sphere, Onion (?), and an Exsphere Shard. The latter item is a required part of the storyline, although not needed until later on in the game.
We're approaching the end of the Sylvarant portion of the story now. Before continuing to Hima, make sure you have taken care of everything you need to in the world; you won't be back in Sylvarant anytime soon. In particular, you won't be able to find White Silver or Red, White, and Black Satay spices for a period of time.

In Hima, use the Brass you got from the Iubaris boss to customize the Nimble Rapier for Lloyd. The item shop has been "upgraded", I guess you could say. You can now purchase Moon Robes and Iron Bracelets, at the expense of losing the Amber Cloak, Cleric's Hat, and Pretty Mittens that are now missable items if you didn't purchase them before. The Osafune, replaced by the Sinclaire now, is also technically missable since to get one you would have to sacrifice your Mumei weapon to customize for it. You already should have a Moon Robe and Iron Bracelet, but buy five extra of the latter for customization purposes. Stock up on Life Bottles, too.


When you're all prepared, climb to the top of Hima's plateau to secure a ride with the newly-created dragon tours to the Tower of Salvation. The group then disperses around town for the night. Whoever Lloyd talks to first will receive a boost in affection with him. I would not choose Colette, however, as talking to her advances the story.


After speaking with all other party members, talk to Colette. The two will share a moment overlooking the Tower of Salvation. Despite her fear of losing more of her humanity and becoming an angel, she's resolved for the people of Sylvarant. Lloyd continues to be tortured by his inability to do anything.

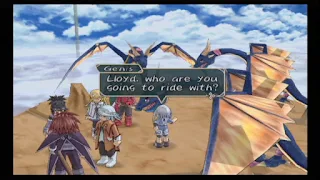
The next morning, climb to the top of Hima to board the dragons bound for the Tower of Salvation. Kratos insists on riding with Colette, so Lloyd will have a chance to pick one of the other characters to ride with. If you choose Genis, Colette and Genis' affection is improved. Selecting Raine displeases Colette (?), but increases Raine's affection. Lastly, Colette highly dislikes if you pick Sheena, but Sheena's affection is raised. Once you've made your selection, the group departs for the final Seal.


You find Colette kneeling in prayer before the last Seal. Remiel comes in to encourage her, but like all villains, has to reveal to everyone that Colette is about lose her heart and memory and become the physical vessel for the Goddess Martel! Raine finally admits to everyone what she has known all along: Colette becoming an angel means giving up her life entirely. Lloyd tries to stop Colette, but Genis holds him back. Remiel asks: would Lloyd choose to save Colette over the world itself? Breaking free from Genis, Lloyd tries to reason with Colette, but she assures him that this is what she wants; despite learning that Remiel considers them "inferior beings" and had manipulated her into thinking he was her true father. The angel transformation is then finished; with a now lifeless and red-eyed Colette learning the spell Judgment. Remiel maniacally laughing now, Lloyd isn't going to allow this to go any further!

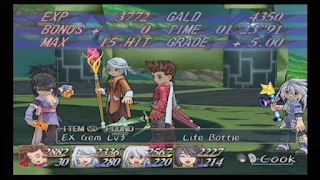
As you might imagine, Remiel is going to be a tough boss. Hopefully, you equipped Lloyd with the Stun Charm to reduce some of his light-based magic because he's going to continuously assault you with it; needing very little time to cast. Have Raine cast Acuteness/Keenness on Lloyd and Sheena and stand ready with Nurse or Heal at anytime. If/when Remiel manages to get a spell off, be mindful of its target and stop fighting to execute a Guardian tech to defend. In addition, he'll use a bow to shoot an arrow of light than can pierce through multiple characters causing plenty of problems if grouped together. Do your best with comboing Lloyd and Sheena's attacks, with Genis supporting, to attempt to interrupt his casting and keeping him off-balance is the key to winning. Even though this is a difficult battle, I highly recommend that you save your Unison Attack gauge for the boss that follows this one. In defeat, Remiel coughs up an EX Gem Lv1 and a very important Rune Bottle. Also, make sure than Sheena cooks Seafood Stew afterwards to prepare for the next boss!

Lloyd tries to call out to Colette, but she just floats there, devoid of any emotion. Watching from afar, Kratos says that Lloyd's attempts are useless. A dying Remiel calls out to "Lord" Kratos to help him, but he has no remorse for the manipulative angel. Kratos has betrayed us; he's, in fact, also an angel and member of the Cruxis organization, aiming to take Colette to Derris-Kharlan to merge her body with the soul of the Goddess Martel. A hurt and furious Lloyd isn't about to let this happen, though!

If Kratos is defeated, the group receives a large amount of EXP, an EX Gem Lv3, and Life Bottle. I'm putting this here because I am not completely sure these items are guaranteed to drop, but if at anything, they are likely to be gotten. Unfortunately, if you don't get them, you will have to reset and try again.

