Orochi and a Mizuho native posing as a Renegade greet the party at the entrance to the Tethe'alla Base. The Renegade mole brings the party inside, but Zelos mysteriously disappears, before claiming he was just doing some "reconnaissance". Orochi explains that a set of pass codes need to be found to open the hangar containing the Rheairds.
The whole bunch of Renegade lackeys from the Sylvarant Base roam around the Tethe'alla one: Foot Soldiers, Evil Warriors, and Raybits. For the former two, this is their last appearance in the game, so using Magic Lens and obtaining their drops here is crucial. Since we don't have Colette, if you didn't get their stolen item yet, you will be unable to complete their entry now, unfortunately. There is also the new, double-bladed polearm, Zidane-esque Commander enemy in certain scripted battles. You only have three shots to not only have Raine use a Magic Lens, but get their drop, too.
Note: The Tethe'alla Base is a one-time dungeon and you can never get back inside. That said, make absolutely sure that you have looted all of the treasure chests and complete the entries here for the Monster List before the boss fight.

You begin in a room with Orochi, who will heal you if spoken to. Use the Ring altar to change the Sorcerer's Ring effect to the Base-typical ball of lightning. There's also a basic item vending machine to the lower-left of the room, but make note of the now-purchasable Miracle Gels that are very nice. Head outside and through the eastern door. The corridor puzzles involving the blue blocks and the energy beams are easy: you just need to move the block in front of the beam; leaving a beam-free opening for you to go around and/or pull it from the other side if you need to. Enter at the door to the right-side of the corridor and fight the first of three Commanders inside the tiny room. He'll provide you with a part of the pass code to the hangar when defeated.
Back out to the corridor, exit north to a large room with many blocks and beams. First, open the chest containing the Silver Circlet headgear for Raine just to the upper-right. It provides more Defense than the Gold Circlet, but less Intelligence; so you could choose either, but I go ahead and equip the Silver Circlet. Use the blocks to work your way around, counterclockwise, to the northwestern door.

Exit west again in the new corridor. Note: If you're needing to get the Commander drop (Pineapple Gel), use the northern corridor exit to find a save point to use. In another large room to the west, is the second of three Commanders who provides another pass code for the group. If you don't get the drop this time, I suggest you reload your save and retry since it is nearby. Climb the stairs onto the small platform and shoot a burst of electricity at the conduit to charge the elevator nearby, then use the blue panel to raise the elevator with the block on it to the top level. There should be two new skits to view in this room, as well, "Tingles" and "Renegade's Technology".
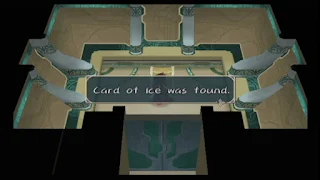
Return all the way back to the room outside the control room with Orochi, using the western exit this time. Continuing to the west, there are two doors with two treasures inside them: an EX Gem Lv2 and Card of Ice weapon for Sheena.
Exit north from the corridor, then use the door on the left-side, past the Raybit in the next one. There's a chest containing an Ex Gem Lv3 and the third, and last, Commander to fight. You receive the final piece of the pass code afterward.
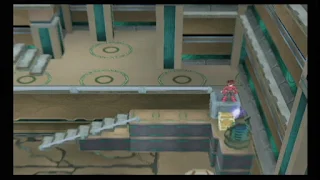
Out in the corridor, use the northern exit again. The Raybit in the room provides a Memory Gem for you when defeated. Drag the block off the elevator to the far-right you raised, and push it off at the point indicated in the above screenshot. It will destroy the machinery generating the beams below, allowing you to approach the treasure chests. Now, return eastward to the room below.
The chests contain the Dragon Tooth weapon for Lloyd and Lightning Sword for Zelos.
Outside the room with the weapons, exit north to a rather complicated-looking room. Begin by climbing the stairs near the save point and grabbing the chest with a Silver Mail for Lloyd or Zelos. I equipped this to Lloyd and gave Zelos the Battlesuit.
There are two free blocks to move around at the bottom level of the room. Push them back-to-back, just below the pillar with the chest on top of it, and against the set of stairs. Use the stairs to step off onto the blocks and find a semi-hidden chest with an Aqua Cape accessory. It has the same statistics as the Thunder Cape, but protects against water and ice attacks. I switched this with Presea's Water Spider, just for some equipment diversity, honestly.
Leave the room to reset the blocks. Then, to the upper-left-side of the bottom floor, push the blocks into the spaces against the wall; creating a bridge across. Use the stairs to descending down and across to a Lavender treasure. It's a +1 Strength statistical item, but don't use it or transform it with a Rune Bottle! It is a very rare item! When you have it, position your character diagonally, on the third cube of the bridge, and shoot lightning at the conduit to power the elevator nearby.
Once more, exit to reposition the blocks. Push one of the blocks onto the elevator; the upper-right corner of it. Then, with your character standing to the left of the cube, switch on the elevator. Push the cube off the elevator one space, onto the top level, then descend back down to the bottom floor.
Use the left-sided stairs to move to the upper levels, then down another set of stairs to your right to be on the level you left the block. Pull it eastward, then push it into the space seen in the above screenshot. Stand on the block and use the Sorcerer's Ring to charge the conduit and elevator below it.
Push a block onto the lower-eastern elevator to travel to even higher levels with. Push it into the gap in front of the chest to obtain the Tomahawk Lance weapon for Presea.
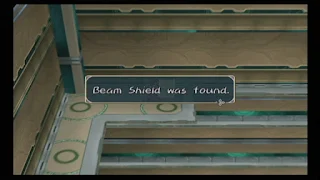
Using the stairs, work your way around to the western-end and crack open the Beam Shield chest for Zelos. With it having +10 Defense over the Omega Shield, and reducing light-based damage, I exchanged the two. I then put the Cleric's Hat back on Zelos and gave Lloyd the Duel Helm he had equipped.
For the last treasure, charge the conduit you passed on the way to the Beam Shield. Descend with the lift and cube on it. Push the cube off on top of the other cube below the pillar with the chest on it. Walk across and procure another EX Gem Lv3.
Leave, then reenter the room to reset the blocks once more. Save your game and have Sheena cook Seafood Stew in preparation of the coming boss fight. Consider the Thunder Cape and Paralysis Charms again for lightning protection, too. Push a block onto the lower-right elevator again, rise up, then push the block into the right-sided gap to access the lift on the far-side. Use the blue panel near the hangar door to provide the pass code: "THE LIFE OF MANA IS THE FOUNDATION OF THE WORLD".
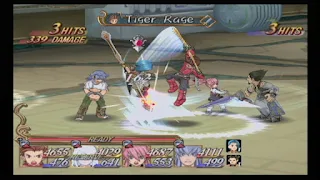
Yuan and Botta were both awaiting you inside the hangar and the battle is on. Yuan is easily the most dangerous here, with Botta being more of a pest with his earth magic. As such, try to eliminate Botta first by using your Unison Attack right away. If you brought Raine, her statistical boost spells are highly advantageous, if not, don't be afraid to use Flare/Guard Bottles or even Energy Tablets. You may encounter trouble if Yuan decides to go after your spell casters when focused on Botta. If this happens, immediately target him so your mages can flee to a safer spot.
Once Botta falls, you may think the battle becomes easier, but Yuan is more than enough of a match for the entire party. His physical attacks are brutal and he combines these with area-effect lightning magic; including the Indignation spell Volt used. Like the previous battle, when you see the blue ring develop below Yuan, immediately order your nearby characters to use their Guardian skills and try to backstep out of the ring. This spell has potential to kill everything in its range without protection against lightning. Hopefully, you'll get a second charge of your Unison Attack gauge and can use it to finish Yuan off. For winning, the party receives their first EX Gem Lv4.
If thus far into the game, you've managed to avoid retreating from a single battle, Lloyd will gain the Brave Soul title (HP, Str, Eva: 50%, Def: 40%) afterward.
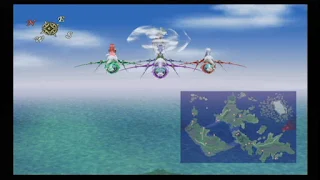
A sudden earthquake strikes Tethe'alla and the party uses this opportunity to swipe the Rheairds from the Renegades. We now have complete access to the world on our new flying machines. Look for the new skit "Common and Silly" while onboard. If you try to enter any dungeon, another small skit, "Not the Time to Wander Off", will occur, too. To rescue Colette, we've got to fight one of the hardest bosses in the game, so some preparations are in order. If using Sheena, switch her to the Card of Earth weapon and equip any Stone Charms you may have; these will provide protection against earth attacks. If you need to purchase Stone Charms, you can find them in the snowy city of Flanoir in the northeast. Also, fight some battles to refill your Unison Attack gauge and cook the Meat Stew recipe with Regal. When prepared, fly the Rheairds east, between the snowy and southern continents. You'll spot a wind-swept island in the sky.
The party leaps off the Rheairds onto the island where Colette is being held. Colette warns that it's a trap, but an illusionary Rodyle appears and taunts the party; mocking that he doesn't need Colette as she is useless to Yggdrasill and his Mana Cannon. He then summons his flock of "pet" dragons for the party to deal with.

You're against the neck portion of one large Winged Dragon and two Baby Dragons. Immediately rush one of the Baby Dragons and perform your Unison Attack on it; the sooner those two are gone, the better. Besides the Baby Dragon's annoying wind gust attack, what makes this battle hard is the constantly-moving Winged Dragon's repeated casting of a Ground Dasher-like spell that is extremely lethal combo'd with the Baby Dragons attacks and seems to come from nowhere. For your controlled character, you can watch for the cracks to form in the ground to sidestep out of the way, if you aren't caught unaware, but there's little you can do for your other characters than try to force a manual Guardian skill. The Card of Earth and Stone Charms will help soften the blow, but not by much. You're going to need to heal; a lot.
My advice is to forgo defense and go all-out to defeat the Baby Dragons, stopping your offense only to use Gels and Flare Bottles when the Meat Stew effect expires. Once you've managed to wipe out the Baby Dragons, the battle is a lot more manageable; only needing to chase down the Winged Dragon after its movements to different parts of the battlefield. When victory is finally obtained, you gain the unique Venom weapon for Regal and the Flare Cape (Fire+Earth defense) accessory. Since we're done with lightning, for the most part, I switched Zelos' Thunder Cape with the Flare one.
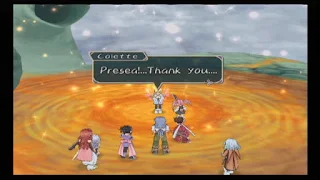
The current of mana flowing out of the subdued Colette engulfs and immobilizes the entire group. Presea sacrifices her own well being to chop the barrier surrounding Colette; freeing her, but injuring herself in the process. There's little time for reunions, though, as the island begins a quick descent from the sky! Thankfully, the Rheairds can carry us all back to safety. Colette explains that Rodyle needed a Cruxis Crystal to power his Mana Cannon, but her's was, apparently, worthless. Presea then wakes from her injury and the party is back together again. Everyone, albet a worried Raine, agrees that our new objective is to form pacts with all of the Summon Spirits from both worlds and severe the mana links between them. Sheena suggests we begin at the Temple of Earth, which the game places you on the world map right outside, however, with our new wings, there is a multitiude of other things to do.
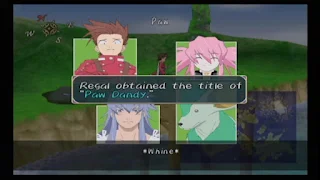
New skits; lots of 'em. Most importantly, if Presea acquired the Paw Mania title before the Temple of Lightning, Regal can now obtain a new title in the follow-up skit "Paw". In this ackward skit, Regal is "awarded" the title of Paw Dandy (Int: 50%, TP: 10%). There are numerous other skits available now, too, including: "Looks Can Be Deceiving", "Top of the Class", "Kendama Competition", "I Can't Tell Anyone", Mystery Behind Zelos, the Valedictorian", "Their Relationship", "Time Does Not Go Back", "Cute and Strong Ribbon", "Thank You for Saving Me", "Zelos' Lecture", "Smile and Forgive", and "Lloyd Reluctant". The latter one is only available if you saw all of Presea's "Wish Tag" skits earlier. For one additional, have Regal cook Meat Stew after a battle to produce the "Unforgettable Taste" skit with Presea. Colette now back with us, let's return to the Temple of Lightning.

On the western-end of the Temple's island, there is a ring of light here now for Colette. Lloyd can respond: "Yeah. You're right." to increase affection with her, or "Well, duh." for no change to occur.
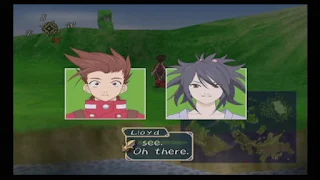
Fly to the area just behind the Temple to see another light ring, for Sheena, this time. Reply: "Oh there." to boost Sheena's affection or "I see." to leave things the same.
With Colette's ability to steal, let's backtrack to inside the Temple of Lightning for a few notes. If you're in need of Brass, she can lift it from the Thunder Swords, who drop it, also. The most notable, however, is the Gold Slime she can nab Fine Pellets from; which they drop, too. In my opinion, this is the best place in the game to farm Fine Pellets for the Figurine Book. Keep this in mind for later.
Ready to take a trip around the world? I hope so, because there's lots to do and find! Let's start from the Temple of Lightning. To the southeast, on top of the highest peak of the island chain, you'll easily see a Guidepost Monument to activate. With the Rheairds, we don't have much need for Noishe anymore, but you know, completion.
Fly southwest from the Monument and land on the grassy backside of the small piece of land; facing the snow-covered continent. There's a ring of light skit for Presea very well hidden in this alcove. Have Lloyd respond: "Yeah." to boost affection with Presea or "Don't be too afraid, though." for no change.
Head for Ozette, then turn the Rheairds southeast over the mountains. From the air, you'll see a large forest circling around a smaller one with a clearing between them. Search in the forests to the northwest of this area to find a hidden treasure with the Sephira accessory inside. If you keep the bridge that leads to Ozette in camera view, you should find it easily. If this is the first Sephira you've acquired, immediately use a Rune Bottle to turn it into the money-doubling Blue Sephira.
In the same area, look for a ring of light to the southeast. Lloyd can respond to Colette: "Wow!" for increased affection or "Okay." for no affection change.
Head southwest from the Colette skit to see another Guidepost Monument to activate near the Tower of Salvation.
Just a little further west is a Zelos light ring skit on the grassy plain stretching into the ocean, southwest of the Tower of Salvation. Lloyd has the option to say: "Being the Chosen is tough, huh?" to increase affection with Zelos or "I see." to leave things.
Since we're nearby, make a stop over in Meltokio. Remember: You have to enter through the sewers. Around the city, a new skit "Zelos' Power of Observation" should pop-up. Make your way to the noble district; east of the Castle Tethe'alla courtyard, and enter the mansion to the far-right. Talk with the girl near the window for a small scene with Presea. Upon leaving, Lloyd can ask: "Is something wrong?" to boost his affection with Presea, or "Let's go." for no change at all. From there, let's visit Sybak.
There's a new student NPC standing near the junk dealer. Talk to him and he'll want to give Sheena a ring that belonged to a former girl he loved. You'll acquire the Pink Pearl Ring item that is the beginning of an otherwise fruitless side-quest.
We still can't get back inside the Research Academy, but if you talk to the man, Horace, who is outside next to the stray dog, it produces a scene with Presea. She recognizes him from Ozette, and knows of Horace's sister, Janet in Meltokio, also. Try to leave the screen and Lloyd will be given a choice. "Do you really want to leave it like that?" boosts affection with Presea, with "Okay, let's get going." having no effect.
To finish this up, return to Meltokio and try talking to Janet in her mansion again. Just like last time, attempt to leave and Lloyd will be given a choice. Saying: "Presea..." gives a huge increase in affection to our pink-haired friend, with "Let's go." having no effect at all other than your own personal shame of having picked it.
Back to the world tour now...Fly to the island northwest of Meltokio that houses a solitary building, the Hot Spring. Talk to the "priest" at the entrance of the bathing area for a small scene with Zelos where he learns that it is currently out of commission. Funny, because I can see an NPC in there using it! Anyway, there's nothing to do here, right now anyway, other than to go ahead and pad Zelos' "hunny" count. To digress, the Hot Spring is always secluded from the rest of the world in these games, isn't it?
Zelos' "Hunny" Count at the Hot Spring: 2
Land on the island due-north of the Hot Spring; on the grassy area just past the two tiny islands. There's a treasure with the Revive Ring accessory inside. When equipped, it provides a certain percentage to auto-resurrect the character when they fall in battle. I'm unsure what the exact percentage is, but if I had to speculate, around 20-30%. Luck may also be a factor in this equation, too. I, personally, don't think it's worthy of an accessory slot, but you decide for yourself.
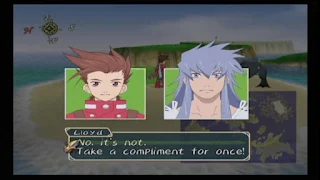
Directly behind the island holding the Revive Ring is a small sandbar you can land on. It holds a skit light ring for Regal. Respond: "No, it's not." to increase Regal's affection or "Take a compliment for once!" to no effect.
From there, follow the chain of small islands to the southeast and land on the last plateau that is raised up out of the ocean. There's an EX Gem Lv4 treasure chest on it.
Let's fly to the large continent to the southeast now. At the tip is the Ymir Forest dungeon later on in the game, however, search on the beach to the southwest of it to find a ring of light for Raine. Responding: "Why do you try to act tough?" boosts affection with Raine, while the former leaves it alone.
From Raine's skit, fly over the small mountain directly to the southeast, and land on the small grassy area beyond it. There's a light ring for Sheena hidden in the corner; facing the later Latheon Gorge dungeon. Reply: "Huh? Are you crying?" to boost affection with her while "Wow...Sheena's crying." has the values remain the same.
Literally on the other side of the shore, to the east, of Sheena's skit is a treasure with Elven Boots. These provide a +9 to Defense and increase the character's movement speed in battle. I swapped this with Regal's current Holy Ring, then gave the Holy Ring back to Presea over the Attack Symbol.
Leaving from the Elven Boots, fly just a little to the southeast until you spot a forest. Land and search for the Zelos ring of light. Lloyd can ask: "Why?" to increase his affection with Zelos or "Well, it doesn't matter." for no change.
North from there, you'll spot a seemingly out-of-place House of Guidance. Besides resting, there's nothing to be done here, but we stopped by to collect "hunnies".
Zelos' "Hunny" Count at the Southeastern Continent House of Guidance: 2
Fly directly east of the House of Guidance and look for the Guidepost Monument amongst the overgrowth of forests. This is the last Guidepost to activate in Tethe'alla.
East of the Monument, very well hidden in the forests, is a light ring skit for Colette. Respond: "Maybe." to boost affection with Colette or "I doubt it." to leave things alone.
Return westward to the Toize Valley Mine. A little further west, on the grassy area extending out into the ocean, is a Presea skit ring. Lloyd can reply: "...What?!" to increase affection with her or "Does it matter?" to leave values the same.
Fly to the far-eastern tip of the southeastern continent. In the narrow path between the mountains and shoreline is yet another Presea ring of light. Asking: "Is something wrong?" boosts affection while "I'll leave her alone." changes nothing.
From the second Presea ring, continue along the narrow path and you should come across a treasure chest containing a Rare Pellets item off the shoreline.
Fly back over the previous Guidepost Monument and then directly north out onto a sandbar. Genis has a light ring skit here. Reply: "Anything's fine." for increased affection or the former for no change.
Directly west of the Genis skit, on a sandbar surrounded by ocean, is a chest containing an EX Gem Lv3 to procure.
Phew, lastly, north to the island where the resort Altamira is located. We'll be visiting there shortly, but first, look near the mountains for a Regal skit ring. Respond: "That's hard to imagine." to boost affection with Regal, or you can laugh to remain neutral.
One last stop before we close the chapter. We're looking for Exire: The City in the Sky. It randomly changes locations each time you exit out to the world map, but it's usually easy to find by being a lone dot on your map in the middle of the ocean. You'll need to use the "B" button to land on it.
There will be events here later, but we're here now for stray dogs, "hunnies", and a great recipe. The city is fairly linear, just follow the sets of stairs and small islands connected. You'll spot your first dog, Colette names Simon, shortly after entering.
At the center of the city, you'll have to pass through several people's private residence to get to the other side. That's got to get really old for the people there. On the second level is a Rheaird diorama that becomes the Wonder Chef when examined. He teaches you the excellent Shortcake recipe that restores a large amount of TP.
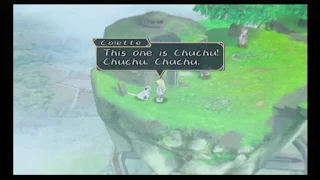
On the other side of the residences, beside a crumbling, old structure is another stray. Colette will name this one, Chuchu. Wait, what? That name sounds awfully familiar. Anyways, that's all we can do in Exire until later on. Make sure to collect "hunnies" with Zelos and take back to the skies for the next chapter.
Zelos' "Hunny" Count in Exire: 7