

New Monsters in the Gaoracchia Forest: Pumpkin Tree, Boxer Iris, Tropical Worm, Ghoul, Phantom, Undertaker

Lots of new monsters are found within this dense, labyrinth-like Forest. Tropical Worms drop a new type of customization item, Mystic Herb; and this is one of only two enemies that hold them. They are a fairly common drop, so make sure to get at least four for future purposes. Ghouls hold Super Pellets to steal and drop, if you want to pick up some of these, but a better location to farm them will come later. Their fellow undead, Phantoms, drop Black Silver, which is your best source for it in Tethe'alla.


There are new monsters to encounter here, but we'll cover them in a bit. For now, look for the Gaoracchia Forest area's Guidepost Monument to activate to the east.


Exit east of the Phoenix Rod, then use the first upper-right exit. This is the first of several areas of the Forest that cycle in an endless loop until you return the way you came. The purpose for coming here is that continuing to use the loop, as if you are lost, produces two skits: "Legendary Strategy" and "Best Strategy".


To find the next treasure, you are going to need to hike to the extreme southeast of the current screen. To disperse the vines, you have to be extremely precise with the light because, for whatever reason, this shrub is stubborn. Once melted, take the Pretty Ribbon inside the chest. I equipped it to Sheena.


The exit to the southwest, that takes you to another endless cycle, has a familiar foe just before it: the Sword Dancer! Of course, if you didn't defeat him earlier at the Ossa Trail, he will not appear here. You can fight him if you like, but personally, I fight him later on. Back the way you came, exit to the southeast to find a save point in a clearing, then further southeast to a boss fight. Note: There are other patches of vines that you can burn away in the Forest, but they contain monsters and not treasure.

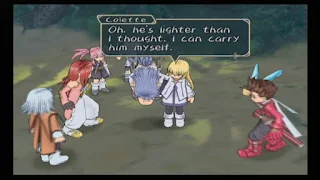
The route to Altessa's House being cutoff, and to prevent a pincer attack from the Papal Knights in the Forest, Sheena sees little choice but to take the party to her hidden village of Mizuho. Zelos is told to carry the blue-haired man with us, but he grumbles about how heavy he is. Personally, I think they should have had Presea drag him by his leg like she did the sacred wood in Meltokio, but anyway, Colette can scoop him up with one arm, apparently!
Exiting to the southwest takes you out to the world map near Mizuho. There are many new skits to view before entering the small hamlet. They being: "Mizuho, Kingdom of Gold", "Mizuho, the Mysterious Kingdom", "People of Mizuho", and "Pretty Boys Die Young". Don't enter without at least seeing the first two skits.


To begin to save the two worlds, we're first going to need the help of the Rheairds, though. Thankfully, Sheena attached a guardian (Tracking device?) to them, and Mizuho's network will be looking for their location while the party visits Altessa. After the conversation, Lloyd gains the title Gentle Idealist (Def, Int: 40%, TP: 10%).

Outside, the blue-haired Convict reveals that his name is Regal and Zelos suggests we let him fight alongside us. Some of the party is hesitant, but Regal gives his word that he will not betray you. Regal then joins your party. Finally, the party is full; at least for the moment. Regal uses cloaks, like Genis, as his armor, but the strongest one you can have for him at this time is the Amber Cloak. Equip him with the Cleric's Hat and Angel Bracelet, as well. We'll talk about his accessories once we visit the shop. Note: Regal comes equipped with the second of only two Cloaks found in the game.


Let's take a look at Mizuho's shops now, but before that, you should know that you can save 10% at all shops by equipping Regal's Lv2 Personal EX Skill; you also gain an extra 10% on your sold items. At the customization shop, we run into the same problem of lacking Metal Spheres, but we can create two Assault Daggers for Zelos.

With Lloyd's lightning elemental Shiden equipped, he can access two unique techs. If having used Sonic Thrust and Tiger Blade at least 200 times, they will become Lightning Thrust and Lightning Tiger in battle. Lightning Thrust is, more-or-less, Zelos/Kratos' Lightning Blade, but Lightning Tiger is very nice. Anytime Lloyd's weapon becomes lightning-based, through Sheena or an item, these techs will activate, also.
Zelos' "Hunny" Count in Mizuho: 4
Back out to the world map, look for another skit "Chosen From the Other World" to appear and to activate one more, have Regal cook a recipe after battle to view "Chef Regal". With Regal now in our party, Presea can receive another title, as well. Form a party of Presea, Sheena, Zelos, and Regal and win a battle. For battling with only characters from Tethe'alla, Presea gains the Associate title (Def, Int: 30%). This becomes a missable title if Kratos rejoins your party and you lose Zelos.
There's one other skit you can view with Regal, titled: "Fight with Your Feet", but in order for it to activate, you need to drop your entire party's Gald down to exactly 0. I wouldn't recommend it, but the opportunity is there if you want to view all of the skits.

With our final character joined, let's take a look at the titles he can possess right now.
Regal's Titles
Convict: Character's default title with no statistical gain.
Battle Artist: Regal gains this title at level 40. (HP, Str: 50%, Acc: 40%)
Perfect Battler: Regal gains this title at level 100. (HP, Str: 100%)
Testosterone: Form a party of Lloyd, Genis, Zelos/Kratos, and Regal and have them fight a battle together. Afterward, having a party full of just the guys, Regal obtains the title. (Int, Eva: 40%)
Potion King: For this, you need at least six Palma, Mizuho, or Flanoir Potions. Use six of these on Regal during a single battle for him to receive the title. (Str, Def, Acc: 30%)
Pratfall King: To start, be in control of Regal and set your other party members' Strategy to "Hold Position". Go back inside the Gaoracchia Forest and look for a Boxer Iris monster. Let them punch Regal backward, but don't recover in mid-air with the X button; instead, let him land flat on his back and then get up. Have this done to you three times in one battle and Regal will pick up the title upon the battle's end. (Def, Eva: 40%, HP: 20%)
Way of the Jungle: Basically, Regal needs to win a battle with an enemy that he has a nine+ level advantage over. If you're over-leveled, you can easily get this right now; but for some players, you may need to wait until you can go back to Sylvarant and fight weaker monsters. (HP: 40%, Def, Eva: 30%)

Regal learns two HP recovery techs; which aren't bad at all, however, you'll quickly learn that the AI loves to use them. In my opinion, it's a good idea to switch these off and leave Regal on the frontlines fighting instead of him constantly trying to drop back and heal when a character's HP drops. If you need to use them, you can always issue a manual order, or use them to recover outside of battle.
New Monsters in the Gaoracchia Forest, Mizuho, Ozette, and Altessa's House areas: Mantis, Gold Beetle, Ranger, Drake (Plains/Barrens), Beast Ogre (Forests), Seahorse (Beach near Ozette)

The monsters in this section of the continent span over the entire Gaoracchia/Ozette/Mizuho region. Most of them aren't of interest besides adding their data to the Monster List, but finding the Drake monster will take some time. They CAN be found on the grassy plains, from a large monster icon, but are incredibly rare. In my experience, they can be encountered easier on the brownish barren spots where the Guidepost Monument was found by exiting the Gaoracchia Forest to the northwest.


The exit to the Ozette region is the first eastern path in the Gaoracchia Forest, having entered from the Mizuho area. Ozette is settled into the forests to the south, just off the bridge. However, if you want to view a usually-missed scene, move past Ozette, to the northeast, and board the EC at the pier. Sail directly north until you reach the large southern continent, then divert east to another pier. Inside the mountain to the north is the Toize Valley Mine dungeon. Enter and the group will find the Papal Knights confused by some sort of trap that has been erected at the Mine's entrance. Nothing special, but is easily missed by a lot of players. Note: Before entering Ozette, be aware that Presea will be leaving your party for a while, then Colette once she returns, so if you want to do some leveling with all eight party members, now is your chance.

Note: It's extremely important to understand that Ozette is a temporary area, and as such, everything here, from the Tenderloin recipe, dogs for Colette to name, Zelos "hunnies", and most of the armor shop stock are all missable! I will warn you when this is about to occur, however.

Down the hill from the inn, sitting outside the shop, is a dog for Colette to name, Kalcy.


As noted before, the Breastplate, Silk Cloak, Witch's Robe, Cross Helm, Pretty Ribbon, Angel Bracelet, and Silk Gloves all become missable items once Ozette is destroyed. The elimination of the Breastplate causes another later item, the Reflex armor, to become missable, as well, since it is a required part of customization.

There's an easily-missed pathway that is southwest of the armor shop, that twists up to a grocer high above. There's nothing special for sale there, but it's been a while since we've been able to replenish our food items. There's a dog outside the shop that Colette can give the name Sammy, also.


Zelos' "Hunny" Count in Ozette: 3
Quick Equipment Update:
- Lloyd: Shiden, Breastplate, Cleric's Hat, Claw Gauntlet, Blue Sephira/Water Spider, Spirit Bangle
- Colette: Shuriken, Elven Protector, Pretty Ribbon, Bridal Gloves, Rabbit's Foot, Guardian Symbol
- Genis: Thunderbolt, Silk Cloak, Pointed Hat, Angel Bracelet, Spirit Ring, Blue Talisman
- Raine: Phoenix Rod, Witch's Robe, Gold Circlet, Silk Gloves/Angel Bracelet, Yata Mirror, Water Spider
- Sheena: Card of Wind, Misty Robe/Witch's Robe, Pretty Ribbon, Angel Bracelet, Black Onyx, Warrior Symbol
- Zelos: Assault Dagger, Breastplate, Cleric's Hat, Omega Shield, Water Spider, Rabbit's Foot
- Regal: Leather Greaves, Silk Cloak, Cleric's Hat, Angel Bracelet, Holy Ring, Water Spider

Enter Altessa's home to be greeted by an android-like female named Tabatha. At the first mention of Presea, Altessa immediately orders the party to get out! Tabatha apologizes; explaining that Altessa doesn't hate Presea, but is guilty for his role in her experiments. She does provide a hint to the group, though, in the knowledge that Inhibitor Ore is required to forge a Key Crest for Presea. Thankfully, back outside, Regal knows just the place we can find some; which draws suspicion from Zelos.
On the world map, many new skits become available. They are: "Is Tabatha an Angel?", "Use Your Head", "Homesick", "Dirk and Altessa", and "Shackles". Watching "Use Your Head", look for the name "Moria" being dropped as being connected to the Toize Valley Mine; an obvious homage to the Lord of the Rings! Note: Play Lord of the Rings: The Third Age on PS2!


New Monsters outside the Toize Valley Mine: Red Mantis, Scarlet Needle, Basilisk (Plains), Bacura (Pier), Killer Bee, Storm Claw, Red Bat (Forests), Mermaid (Beaches)
If you're planning to fight around the Toize Valley Mine area, I highly
recommend you keep Raine close at hand because the monsters can cause a
myriad of status effects. Depending on the location around the Mine
that you fight, you can encounter several different enemies. You only
need to concern yourself with the Red Mantis, Scarlet Needle, and
Mermaid, however, since the other monsters are found inside the next
dungeon or better accessible in other ones. Besides being a very
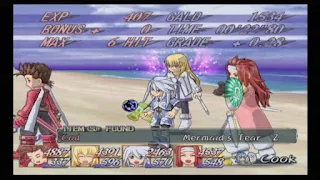
rare encounter from a large monster icon on the beaches, the Mermaids
drop Mermaid's Tears that are your source for them, at the moment, but
we'll find a better alternative in Tethe'alla later. In regard to the Killer Bee,
if you don't want to wait until the later dungeon, they very rarely can
drop the valuable Red Saffron item that increases Evasion by 3.
